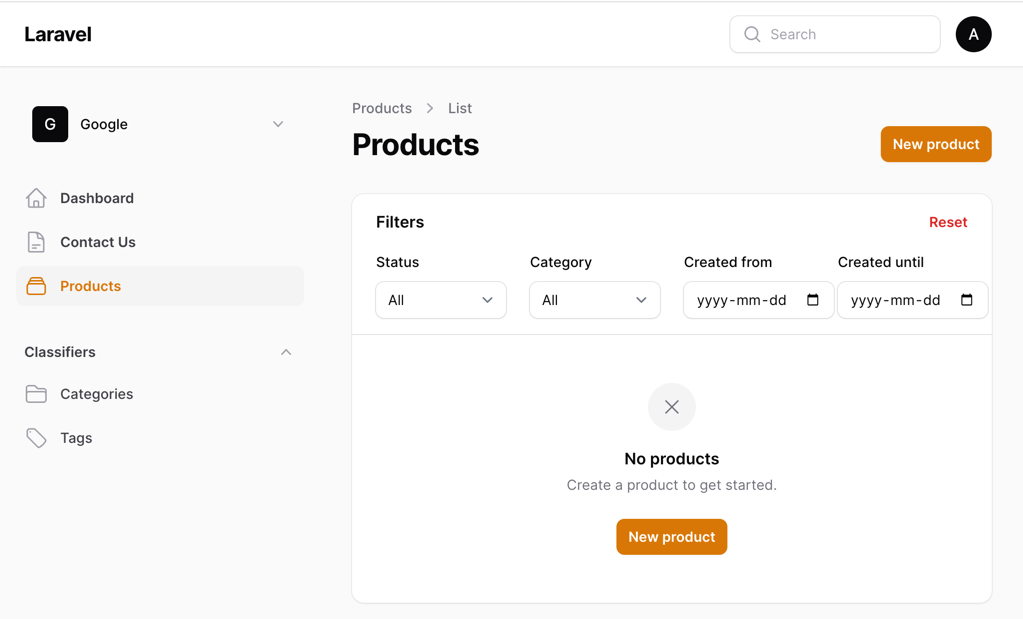
Filament 3 comes with multi-tenancy support out of the box: the screenshot below shows how you can switch between teams/companies, see on the top-left:

This lets you quickly set up a multi-tenant application within a single database, just by configuring the panel. It even takes care of the switching between tenants for you.
It is important to note here that the meaning of multi-tenancy is different for everyone and that the demo in this lesson is just one of the possible implementations. It is not a one-size-fits-all solution. And the tenancy implementation also depends on your custom code more than on Filament core functionality.
Filament documentation says this:
Filament does not provide any guarantees about the security of your application. It is your responsibility to ensure that your application is secure. Please see the security section for more information.
With that said, here's our approach:
tenant Model. For example, Company, Organization, Team, etc.belongsToMany relationship with that Tenant model. In other words, user may belong to many teams.PanelProvider to indicate that this panel is multi-tenant.tenant_id column, or an alternative, like company_id, organization_id, team_id, etc.First, we have to create a multi-tenancy model, which in our case will be Company:
Migration
Schema::create('companies', function (Blueprint $table) { $table->id(); $table->string('name'); $table->timestamps();}); Schema::create('company_user', function (Blueprint $table) { $table->foreignId('company_id')->constrained(); $table->foreignId('user_id')->constrained();});app/Models/Company.php
use Illuminate\Database\Eloquent\Model;use Illuminate\Database\Eloquent\Relations\BelongsToMany; class Company extends Model{ protected $fillable = [ 'name' ]; public function users(): BelongsToMany { return $this->belongsToMany(User::class); }}Once we have our Company model, we can tell Filament that our panel is multi-tenant by adding the tenant() method to our PanelProvider:
app/Providers/Filament/AdminPanelProvider.php
use App\Models\Company; // ... public function panel(Panel $panel): Panel{ return $panel ->default() ->tenant(Company::class) // ...}This informs Filament that it should use the Company model as the multi-tenancy model for this panel. But if you try to access your panel now, you will get an error:

This is because we still need to update our User model. We need to implement Filament\Models\Contracts\HasTenants and add the canAccessTenant() method:
app/Models/User.php
use Filament\Models\Contracts\FilamentUser;use Filament\Models\Contracts\HasTenants;use Filament\Panel;use Illuminate\Database\Eloquent\Factories\HasFactory;use Illuminate\Database\Eloquent\Model;use Illuminate\Database\Eloquent\Relations\BelongsToMany;use Illuminate\Foundation\Auth\User as Authenticatable;use Illuminate\Notifications\Notifiable;use Illuminate\Support\Collection;use Laravel\Sanctum\HasApiTokens; class User extends Authenticatable implements FilamentUserclass User extends Authenticatable implements FilamentUser, HasTenants{ use HasApiTokens, HasFactory, Notifiable; // ... public function canAccessPanel(Panel $panel): bool { return $this->is_admin == 1; } public function companies(): BelongsToMany { return $this->belongsToMany(Company::class); } public function canAccessTenant(Model $tenant): bool { return $this->companies->contains($tenant); } public function getTenants(Panel $panel): array|Collection { return $this->companies; }}Once we have this in place, we can access our panel again:

That's it. Our panel is now informed that it is a multi-tenant application. But there's still a bit of work to do.
As you might have guessed by now, your models must also support multi-tenancy. Otherwise, if you try to load a resource that doesn't support it, you will get an error:

Note: The following actions have to be done for all of your models.
Filament assumes that you have a company() relationship method on your Model. So let's add it:
Migration
Schema::table('products', function (Blueprint $table) { $table->foreignId('company_id')->constrained();});app/Models/Product.php
use Illuminate\Database\Eloquent\Model;use Illuminate\Database\Eloquent\Relations\BelongsTo;// ... class Product extends Model{ // ... public function company(): BelongsTo { return $this->belongsTo(Company::class); }}Now we can load our resource again:

We can even see that the query is filtered by the current tenant, but we haven't added anything to our Product model yet:

This is Filament trying to be helpful and apply a global scope to your model. And while it's a nice gesture, it allows us to accidentally load data from other tenants using a custom query.
To prevent any accidental data leaks, Filament recommends us to implement a global scope Middleware on our models:

To do that, we have to create a new Middleware:
php artisan make:middleware ApplyTenantScopesInside this Middleware, we will apply the global scope to all of our models:
app/Http/Middleware/ApplyTenantScopes.php
use App\Models\Category;use App\Models\Order;use App\Models\Product;use App\Models\Tag;use Filament\Facades\Filament; use Closure;use Illuminate\Database\Eloquent\Builder;use Illuminate\Http\Request; // ... class ApplyTenantScopes{ public function handle(Request $request, Closure $next): Response { // Can also be moved to each model. // This is to prevent data leaking when doing dashboard reports // and other more complicated queries that touch databases Category::addGlobalScope( fn(Builder $query) => $query->whereBelongsTo(Filament::getTenant()), ); Order::addGlobalScope( fn(Builder $query) => $query->whereBelongsTo(Filament::getTenant()), ); Tag::addGlobalScope( fn(Builder $query) => $query->whereBelongsTo(Filament::getTenant()), ); Product::addGlobalScope( fn(Builder $query) => $query->whereBelongsTo(Filament::getTenant()), ); return $next($request); }}And then we can register it in our AdminPanelProvider:
app/Providers/Filament/AdminPanelProvider.php
use App\Http\Middleware\ApplyTenantScopes;// ... class AdminPanelProvider extends PanelProvider{ public function panel(Panel $panel): Panel { return $panel ->default() ->tenant(Company::class) ->tenantMiddleware([ ApplyTenantScopes::class, ], isPersistent: true) // ... }}Once that is done, the current tenant will filter our models even if we try to load them with a custom query.
When everything is configured, and your multi-tenant user is logged in, you will be able to switch between tenants by using the dropdown above the sidebar:

Switching it will switch the current tenant, and all the data will be filtered by the new tenant in the URL segment. For example, we will look at Apple products:

And our query will be filtered by the new tenant:
select `categories`.`name`, `categories`.`id`from `categories`where `categories`.`company_id` in (2)order by `categories`.`name` ascBut if we switch to Google, we will see that the new tenant filters the data:

And our query will be filtered by the new tenant:
select `categories`.`name`, `categories`.`id`from `categories`where `categories`.`company_id` in (1)order by `categories`.`name` asc