.png-674b525e9d6ad.jpg)
These days, security is very important. That's why many applications implement two-factor authentication. In this tutorial, I will show you how to do that in Laravel, using Laravel Notifications and sending a one-time password via email or SMS.
Notice: there are more complicated 2FA methods like Google Authenticator, but in this tutorial I prefer the most simple and most widely used approach of email/SMS.
For a quick authentication scaffold, we will use Laravel Breeze. Install it by running these two commands:
composer require laravel/breeze --devphp artisan breeze:installNext, we need to store our verification code somewhere. Also, we need to set its expiration time, so there's another DB field for this. So, add two fields to the default users migration:
database/migrations/2014_10_12_000000_create_users_table.php:
public function up(){ Schema::create('users', function (Blueprint $table) { $table->id(); $table->string('name'); $table->string('email')->unique(); $table->timestamp('email_verified_at')->nullable(); $table->string('password'); $table->rememberToken(); $table->string('two_factor_code')->nullable(); $table->dateTime('two_factor_expires_at')->nullable(); $table->timestamps(); });}We also add those fields to app/Models/User.php properties $fillable array:
class User extends Authenticatable{ protected $fillable = [ 'name', 'email', 'password', 'two_factor_code', 'two_factor_expires_at', ]; // ...Finally, for filling those fields let's create a method in the User model:
app/Models/User.php:
public function generateTwoFactorCode(): void{ $this->timestamps = false; $this->two_factor_code = rand(100000, 999999); $this->two_factor_expires_at = now()->addMinutes(10); $this->save();}Notice: in addition to creating a random code and setting its expiration time, we also specify that this update should not touch the updated_at column in users table – so we’re doing $this->timestamps = false;.
Now, we're ready to use $user->generateTwoFactorCode() when we need it.
After the successful authentication, we need to generate the code and send it to the user. For that, let's generate a Laravel Notification class:
php artisan make:notification SendTwoFactorCodeThe main benefit of using Notifications is that we can provide the channel(s) how to send that notification: email, SMS and others.
Next, we need to edit the Notification's toMail() method.
app/Notifications/SendTwoFactorCode.php:
class SendTwoFactorCode extends Notification{ public function toMail(User $notifiable): MailMessage { return (new MailMessage) ->line("Your two factor code is {$notifiable->two_factor_code}") ->action('Verify Here', route('verify.index')) ->line('The code will expire in 10 minutes') ->line('If you have not tried to login, ignore this message.'); }We will create the route('verify.index') route, which will also re-send the code, a bit later.
As you can see, we use the $notifiable variable, which automatically represents the recipient of the notification - in our case, the logged-in user themselves.
Now, how/where do we call that notification?
We're using Laravel Breeze, so after login, in the app/Http/Controllers/Auth/AuthenticatedSessionController.php, we need to add this code in the store() method:
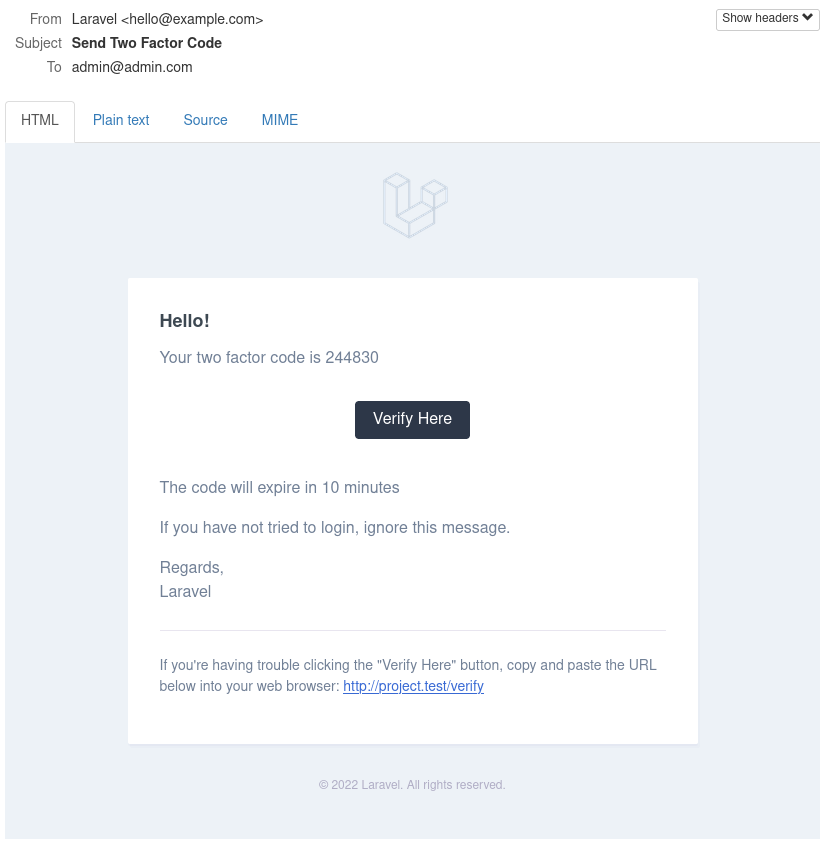
public function store(LoginRequest $request){ $request->authenticate(); $request->session()->regenerate(); $request->user()->generateTwoFactorCode(); $request->user()->notify(new SendTwoFactorCode()); return redirect()->intended(RouteServiceProvider::HOME);}This will send an email which will look like this:

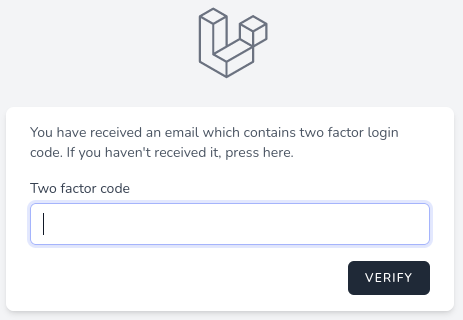
Let's build the restriction middleware. Until the logged-in user enters the verification code, they need to be redirected to this form:

To perform that restriction, we will generate a Middleware:
php artisan make:middleware TwoFactorMiddlewareapp/Http/Middleware/TwoFactorMiddleware.php:
class TwoFactorMiddleware{ public function handle(Request $request, Closure $next) { $user = auth()->user(); if (auth()->check() && $user->two_factor_code) { if ($user->two_factor_expires_at < now()) { $user->resetTwoFactorCode(); auth()->logout(); return redirect()->route('login') ->withStatus(__('The two factor code has expired. Please login again.')); } if (! $request->is('verify*')) { return redirect()->route('verify.index'); } } return $next($request); }}If you're not familiar with how Middleware works, read the official Laravel documentation. But basically, it’s a class that performs some actions to usually restrict accessing some page or function.
So, in our case, we check if there is a two-factor code set. If it is, we check if it isn't expired. If it is expired, we reset it and redirect back to the login form. If it's still active, we redirect back to the verification form.
There is a new method resetTwoFactorCode(). Add it to the app/Models/User.php, it should look like this:
public function resetTwoFactorCode(): void{ $this->timestamps = false; $this->two_factor_code = null; $this->two_factor_expires_at = null; $this->save();}Next, we need to register our middleware in app/Http/Kernel.php by giving an "alias" name, let's call it twofactor:
class Kernel extends HttpKernel{ protected $routeMiddleware = [ 'auth' => \App\Http\Middleware\Authenticate::class, // ... 'twofactor' => \App\Http\Middleware\TwoFactorMiddleware::class, ];}Now, we can assign our twofactor Middleware to the routes in routes/web.php. Since Laravel Breeze has only one protected route /dashboard, we will add our Middleware to that route:
Route::get('/dashboard', function () { return view('dashboard');})->middleware(['auth', 'twofactor'])->name('dashboard');Now, our dashboard is protected by two-factor authentication.
At this point, any request to any URL will redirect to the code verification page. Time to build it - both the page, and its processing method.
We start with generating the Controller:
php artisan make:controller TwoFactorControllerThen, we add three routes leading to the new Controller:
routes/web.php:
Route::middleware(['auth', 'twofactor'])->group(function () { Route::get('verify/resend', [TwoFactorController::class, 'resend'])->name('verify.resend'); Route::resource('verify', TwoFactorController::class)->only(['index', 'store']);});And all the logic in the Controller looks like this.
app/Http/Controllers/Auth/TwoFactorController:
class TwoFactorController extends Controller{ public function index(): View { return view('auth.twoFactor'); } public function store(Request $request): ValidationException|RedirectResponse { $request->validate([ 'two_factor_code' => ['integer', 'required'], ]); $user = auth()->user(); if ($request->input('two_factor_code') !== $user->two_factor_code) { throw ValidationException::withMessages([ 'two_factor_code' => __('The two factor code you have entered does not match'), ]); } $user->resetTwoFactorCode(); return redirect()->to(RouteServiceProvider::HOME); } public function resend(): RedirectResponse { $user = auth()->user(); $user->generateTwoFactorCode(); $user->notify(new SendTwoFactorCode()); return redirect()->back()->withStatus(__('The two factor code has been sent again')); }}Three methods here:
index() method just shows the form.store() method to verify the coderesend() method re-generates and re-sends new code.The form itself just uses the default layout and components from Laravel Breeze, the code looks like this:
resources/views/auth/twoFactor.blade.php:
<x-guest-layout> <x-auth-card> <x-slot name="logo"> <a href="/"> <x-application-logo class="h-20 w-20 fill-current text-gray-500" /> </a> </x-slot> <div class="mb-4 text-sm text-gray-600"> {{ new Illuminate\Support\HtmlString(__("You have received an email which contains two factor login code. If you haven't received it, press <a class=\"hover:underline\" href=\":url\">here</a>.", ['url' => route('verify.resend')])) }} </div> <!-- Session Status --> <x-auth-session-status class="mb-4" :status="session('status')" /> <form method="POST" action="{{ route('verify.store') }}"> @csrf <div> <x-input-label for="two_factor_code" :value="__('Two factor code')" /> <x-text-input id="two_factor_code" class="mt-1 block w-full" type="text" name="two_factor_code" required autofocus /> <x-input-error :messages="$errors->get('two_factor_code')" class="mt-2" /> </div> <div class="mt-4 flex justify-end"> <x-primary-button> {{ __('Verify') }} </x-primary-button> </div> </form> </x-auth-card></x-guest-layout>And that's it with two-factor authentication using email. Now, what about SMS?
The logic of generating the code stays identical. We will just send the code via different Notification channel.
We will make the Notification method configurable: in the config/auth.php, add new array values:
'two_factor' => [ 'via' => ['mail'],],That via value must be an array: in our case, it either can be mail or vonage. For sending SMS we will use Vonage(formerly known as Nexmo), so that's why one of the options is called this way.
For sending notifications via Vonage, we need to install a laravel/vonage-notification-channel package:
composer require laravel/vonage-notification-channelDon't forget to set up the environment variables for Vonage.
Next, we need to edit our Notification class.
app/Notifications/SendTwoFactorCode.php:
class SendTwoFactorCode extends Notification{ public function via($notifiable): array { return ['mail']; return config('auth.two_factor.via'); } public function toMail(User $notifiable): MailMessage { return (new MailMessage) ->line("Your two factor code is {$notifiable->two_factor_code}") ->action('Verify Here', route('verify.index')) ->line('The code will expire in 10 minutes') ->line('If you have not tried to login, ignore this message.'); } public function toVonage($notifiable): VonageMessage { return (new VonageMessage()) ->content("Your two factor code is {$notifiable->two_factor_code}"); } }Here we change via() method to use the value from config, and also we add a new toVonage() which will send an SMS message using Vonage provider.
This way we can easily change the method in the config file, and Laravel will do its magic.
Of course, we need to have the users phone number - where to send the SMS. For that, we will quickly create a new DB field phone_number in the users table, and let users enter it when registering.
database/migrations/2014_10_12_000000_create_users_table.php:
public function up(){ Schema::create('users', function (Blueprint $table) { $table->id(); $table->string('name'); $table->string('email')->unique(); $table->timestamp('email_verified_at')->nullable(); $table->string('password'); $table->string('phone_number') $table->rememberToken(); $table->string('two_factor_code')->nullable(); $table->dateTime('two_factor_expires_at')->nullable(); $table->timestamps(); });}app/Models/User.php:
class User extends Authenticatable{ protected $fillable = [ 'name', 'email', 'password', 'phone_number', 'two_factor_code', 'two_factor_expires_at', ]; public function routeNotificationForVonage($notification) { return $this->phone_number; } In the User Model, we also add the routeNotificationForVonage() method which laravel/vonage-notification-channel package uses to get number where to send SMS to.
resources/views/auth/register.blade.php:
// ... Other Fields<!-- Phone Number --><div class="mt-4"> <x-input-label for="phone_number" :value="__('Phone Number')" /> <x-text-input id="phone_number" class="block mt-1 w-full" type="text" name="phone_number" :value="old('phone_number')" required autofocus /> <x-input-error :messages="$errors->get('phone_number')" class="mt-2" /></div>// ... Other Fieldsapp/Http/Controllers/Auth/RegisteredUserController.php:
class RegisteredUserController extends Controller{ public function store(Request $request) { $request->validate([ 'name' => ['required', 'string', 'max:255'], 'email' => ['required', 'string', 'email', 'max:255', 'unique:users'], 'phone_number' => ['required'], 'password' => ['required', 'confirmed', Rules\Password::defaults()], ]); $user = User::create([ 'name' => $request->name, 'email' => $request->email, 'phone_number' => $request->phone_number, 'password' => Hash::make($request->password), ]); event(new Registered($user)); Auth::login($user); return redirect(RouteServiceProvider::HOME); }}And that's it, now your application is more secure!
In the future, you can add other Notification channels pretty easily. For some methods, you can check Laravel Notification Channels page.