Filament is great for admin panels, but what if you want to use it as an e-shop with payments? In this tutorial, we will show how to integrate Stripe one-time checkout into Filament.
Prepare for quite a long "ride" because there's a lot of work to implement it properly, with all the JS/PHP/Livewire elements, validation, and webhooks.
Ready? Let's dive in!
Our goals in this section:
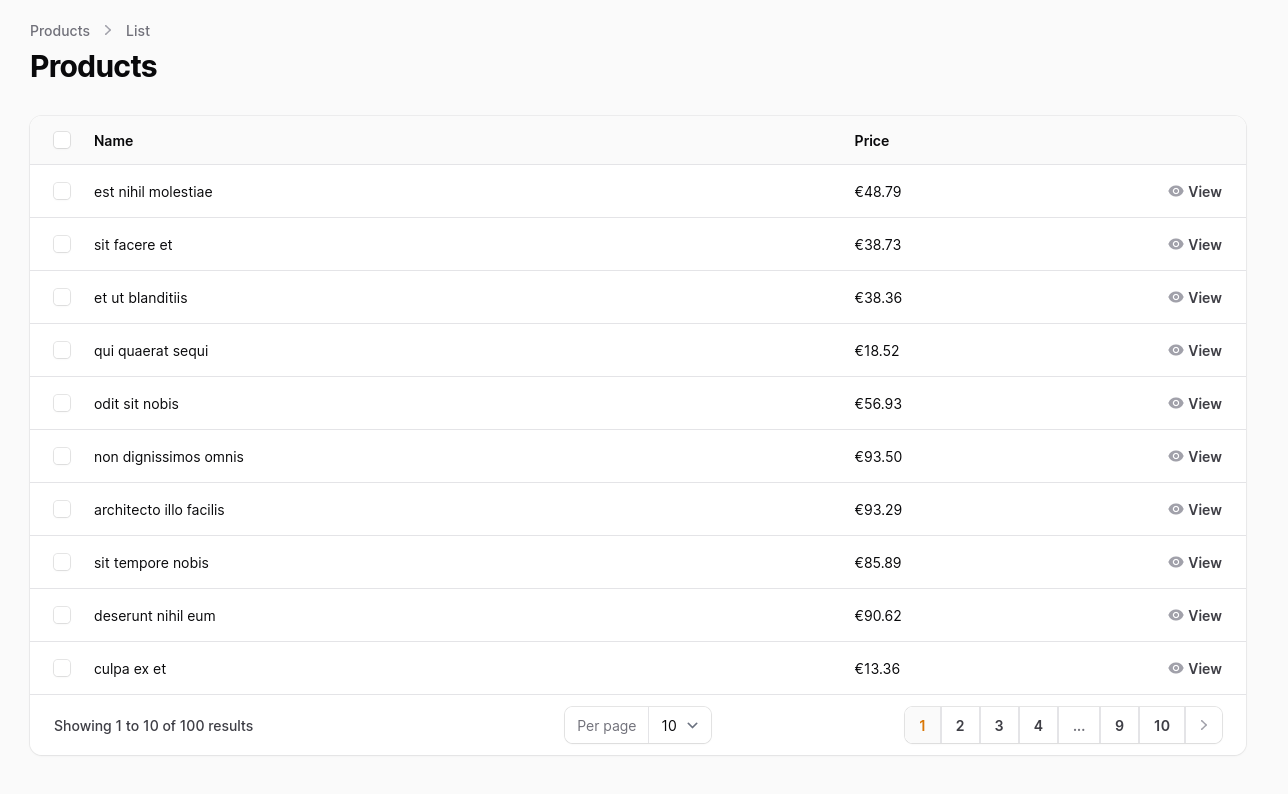
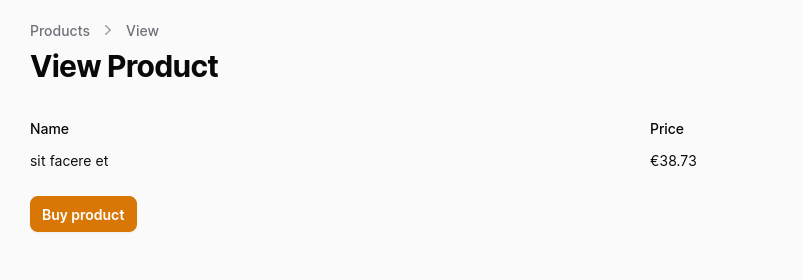
products tableProductResource list and view pagesThat is how our final pages should look like.
First, let's create Models; only the Product will have a factory.
php artisan make:model Product -mfphp artisan make:model Order -mThen, update the migrations.
database/migrations/XXXXXX_create_products_table.php
Schema::create('products', function (Blueprint $table) { $table->id(); $table->string('name'); $table->bigInteger('price'); $table->timestamps();});database/migrations/XXXXXX_create_orders_table.php
use App\Models\Product;use App\Models\User; // ... Schema::create('orders', function (Blueprint $table) { $table->id(); $table->foreignIdFor(Product::class); $table->foreignIdFor(User::class); $table->bigInteger('amount'); $table->timestamps();});In ProductFactory, we define column data. Notice that we store the price in cents.
database/factories/ProductFactory.php
public function definition(): array{ return [ 'name' => fake()->words(3, asText: true), 'price' => rand(999, 9999), ];}app/Models/User.php
use Illuminate\Database\Eloquent\Relations\HasMany; // ... public function orders(): HasMany{ return $this->hasMany(Order::class);}And then add relationships into Models.
app/Models/Product.php
use Illuminate\Database\Eloquent\Relations\HasMany; // ... public function orders(): HasMany{ return $this->hasMany(Order::class);}app/Models/Order.php
use Illuminate\Database\Eloquent\Relations\BelongsTo; // ... protected $fillable = [ 'product_id', 'user_id', 'amount',]; public function product(): BelongsTo{ return $this->belongsTo(Product::class);} public function user(): BelongsTo{ return $this->belongsTo(User::class);}Now let's update DatabaseSeeder.
database/seeders/DatabaseSeeder.php
use App\Models\Product; use App\Models\User; public function run(): void{ User::factory()->create([ 'name' => 'Admin', 'email' => 'admin@admin.com', ]); Product::factory(100)->create();}And seed the database.
php artisan migrate:fresh --seedGenerate ProductResource and view pages using the Artisan command. Filament doesn't create a view page by default, so we must add the --view flag when creating a resource.
php artisan make:filament-resource Product --viewImplementation of the resource file:
app/Filament/Resources/ProductResource.php
namespace App\Filament\Resources; use App\Filament\Resources\ProductResource\Pages;use App\Models\Product;use Filament\Infolists\Components\Actions;use Filament\Infolists\Components\Actions\Action;use Filament\Infolists\Components\TextEntry;use Filament\Infolists\Infolist;use Filament\Resources\Resource;use Filament\Tables;use Filament\Tables\Columns\TextColumn;use Filament\Tables\Table;use NumberFormatter; class ProductResource extends Resource{ protected static ?string $model = Product::class; protected static ?string $navigationIcon = 'heroicon-o-rectangle-stack'; public static function infolist(Infolist $infolist): Infolist { return $infolist ->schema([ TextEntry::make('name'), TextEntry::make('price') ->formatStateUsing(function ($state) { $formatter = new NumberFormatter(app()->getLocale(), NumberFormatter::CURRENCY); return $formatter->formatCurrency($state / 100, 'eur'); }), Actions::make([ Action::make('Buy product') ->url('/'), ]), ]); } public static function table(Table $table): Table { return $table ->columns([ TextColumn::make('name'), TextColumn::make('price') ->formatStateUsing(function ($state) { $formatter = new NumberFormatter(app()->getLocale(), NumberFormatter::CURRENCY); return $formatter->formatCurrency($state / 100, 'eur'); }), ]) ->actions([ Tables\Actions\ViewAction::make(), ]) ->bulkActions([ Tables\Actions\BulkActionGroup::make([ Tables\Actions\DeleteBulkAction::make(), ]), ]); } public static function getPages(): array { return [ 'index' => Pages\ListProducts::route('/'), 'view' => Pages\ViewProduct::route('/{record}'), ]; }}Filament's infolists can use Actions. They are buttons that can be added to any InfoList component. The URL of the button leads to the page's root, but we will update that value later when we have the checkout page.
Actions::make([ Action::make('Buy product') ->url('/'),]),For both TextEntry and TextColumn, we can format cents value with the formatStateUsing() method by providing closure.
->formatStateUsing(function ($state) { $formatter = new NumberFormatter(app()->getLocale(), NumberFormatter::CURRENCY); return $formatter->formatCurrency($state / 100, 'eur');}),If you get the
Fatal error: Class 'NumberFormatter' not founderror, ensure you have the PHPintlextension installed.
Since we do not use CreateProduct and EditProduct forms for demonstration purposes, we can remove create and edit actions from the ListProducts and ViewProduct pages to keep things clean.
app/Filament/Resources/ProductResource/Pages/ListProducts.php
protected function getHeaderActions(): array{ return [ Actions\CreateAction::make(), ];}app/Filament/Resources/ProductResource/Pages/ViewProduct.php
protected function getHeaderActions(): array{ return [ Actions\EditAction::make(), ];}Time to create our custom pages. We will sell one product at a time, so we can skip implementing cart logic and make a Checkout page under ProductResource. Run this command.
php artisan make:filament-page Checkout -R ProductResourcePick the Custom option from the list.
┌ Which type of page would you like to create? ────────────────┐│ › ● Custom ┃ ││ ○ List │ ││ ○ Create │ ││ ○ Edit │ ││ ○ View │ │└──────────────────────────────────────────────────────────────┘Then update the infolist() method with a new Action URL in ProductResource.
app/Filament/Resources/ProductResource.php
// ... Actions::make([ Action::make('Buy product') ->url(fn ($record): string => self::getUrl('checkout', [$record])), ]), // ...And add a route in the getPages() method.
app/Filament/Resources/ProductResource.php
public static function getPages(): array{ return [ 'index' => Pages\ListProducts::route('/'), 'view' => Pages\ViewProduct::route('/{record}'), 'checkout' => Pages\Checkout::route('/{record}/checkout'), ];}When we press the Buy product button now, you should navigate to a URL like this: /admin/products/4/checkout.
Extend the Checkout page and resolve the record from the URL {record} parameter.
app/Filament/Resources/ProductResource/Pages/Checkout.php
use Filament\Resources\Pages\Concerns\InteractsWithRecord; use NumberFormatter; // ... class Checkout extends Page{ use InteractsWithRecord; // ... public function mount(int | string $record): void { $formatter = new NumberFormatter(app()->getLocale(), NumberFormatter::CURRENCY); $this->record = $this->resolveRecord($record); $this->heading = 'Checkout: ' . $this->record->name; $this->subheading = $formatter->formatCurrency($this->record->price / 100, 'eur'); } // ...Another page we need to have is the PaymentStatus page. After payment confirmation, we will redirect users to that page and display its status.
php artisan make:filament-page PaymentStatusThen hide this page from the sidebar menu by adding a static property $shouldRegisterNavigation with a value false. We display this page only after payment, and the user has no intent to visit it otherwise.
app/Filament/Pages/PaymentStatus.php
class PaymentStatus extends Page{ // ... protected static bool $shouldRegisterNavigation = false; }Install the Stripe PHP library with Composer.
composer require stripe/stripe-phpAdd stripe keys to your services.php config.
config/services.php
// ... 'stripe' => [ 'key' => env('STRIPE_KEY'), 'secret' => env('STRIPE_SECRET'), 'currency' => env('STRIPE_CURRENCY'),], // ...And define your actual keys in the environment file.
.env
STRIPE_KEY=****STRIPE_SECRET=****STRIPE_CURRENCY=EURThen, initialize the Stripe library with your secret API key on the Checkout page.
app/Filament/Resources/ProductResource/Pages/Checkout.php
use Stripe\StripeClient; // ... class Checkout extends Page{ // ... protected StripeClient $stripe; // ... public function __construct() { $this->stripe = new StripeClient(config('services.stripe.secret')); }}Now our goal is to add an endpoint that creates a PaymentIntent, but because we have a Livewire component, instead of consuming our API, we can write this functionality inside the Checkout page.
A PaymentIntent tracks the customer’s payment lifecycle, keeping track of any failed payment attempts and ensuring the customer is only charged once. Then we can return the PaymentIntent’s client secret in response to finish the payment on the client.
Add the getClientSecret() method to the Checkout page.
app/Filament/Resources/ProductResource/Pages/Checkout.php
protected function getClientSecret(): string{ $user = auth()->user(); $customer = $this->getStripeCustomer($user); $paymentIntent = $this->getPaymentIntent($customer); return $paymentIntent->client_secret;}Before we create payment intent, we can create a Stripe customer entry to associate our system users to organize data of transactions on the Stripe Dashboard. Let's update the users table migration and add a new stripe_customer_id column.
database/migrations/2014_10_12_000000_create_users_table.php
Schema::create('users', function (Blueprint $table) { $table->id(); $table->string('stripe_customer_id')->nullable(); $table->string('name'); $table->string('email')->unique(); $table->timestamp('email_verified_at')->nullable(); $table->string('password'); $table->rememberToken(); $table->timestamps();});And add that column to $fillable on the User Model.
app/Models/User.php
protected $fillable = [ 'stripe_customer_id', 'name', 'email', 'password',];Then, re-migrate the database.
php artisan migrate:fresh --seedAdd the getStripeCustomer() method to the Checkout page.
app/Filament/Resources/ProductResource/Pages/Checkout.php
use App\Models\User;use Stripe\Customer; // ... protected function getStripeCustomer(User $user): Customer{ if ($user->stripe_customer_id !== null) { return $this->stripe->customers->retrieve($user->stripe_customer_id); } $customer = $this->stripe->customers->create([ 'name' => $user->name, 'email' => $user->email, ]); $user->update(['stripe_customer_id' => $customer->id]); return $customer;}We reuse existing customer entries instead of creating new ones when the user visits the checkout page.

When we call getPaymentIntent() we pass that $customer and associate new payment intents with that customer.
If the checkout process is interrupted and resumes later, we attempt to reuse the same PaymentIntent instead of creating a new one. Each PaymentIntent has a unique ID that you can use to retrieve it if you need it again. You can store the ID of the PaymentIntent on the customer’s shopping cart or session to facilitate retrieval. The benefit of reusing the PaymentIntent is that the object state helps track any failed payment attempts for a given cart or session.
Usually, when you have a cart logic and add/remove items, you can store a single payment intent in the session and later update its amount.
But, because we have a checkout page per product, we must treat those pages as separate carts. Each page has its unique $checkoutKey where we store the Payment Intent ID for the current session. We need that to avoid charging the user with the wrong amount and product in case the user decides to open multiple tabs for different checkout pages.
Add the getPaymentIntent() and createNewPaymentIntent() methods to the Checkout page.
app/Filament/Resources/ProductResource/Pages/Checkout.php
use Stripe\Customer; use Stripe\PaymentIntent; // ... protected string $checkoutKey; // ... public function mount(int | string $record): void{ $formatter = new NumberFormatter(app()->getLocale(), NumberFormatter::CURRENCY); $this->record = $this->resolveRecord($record); $this->heading = 'Checkout: ' . $this->record->name; $this->subheading = $formatter->formatCurrency($this->record->price / 100, 'eur'); $this->checkoutKey = 'checkout.' . $this->record->id; } protected function getPaymentIntent(Customer $customer): PaymentIntent { $paymentIntentId = session($this->checkoutKey); if ($paymentIntentId === null) { return $this->createNewPaymentIntent($customer); } $paymentIntent = $this->stripe->paymentIntents->retrieve($paymentIntentId); if ($paymentIntent->status !== 'requires_payment_method') { return $this->createNewPaymentIntent($customer); } return $paymentIntent;} protected function createNewPaymentIntent(Customer $customer): PaymentIntent // // { $paymentIntent = $this->stripe->paymentIntents->create([ 'customer' => $customer->id, 'setup_future_usage' => 'off_session', 'amount' => $this->record->price, 'currency' => config('services.stripe.currency'), ]); session([$this->checkoutKey => $paymentIntent->id]); return $paymentIntent;}If the current PaymentIntent has a different status than requires_payment_method, we issue a new PaymentIntent for the sake of simplicity. There might be better scenarios for your case.
if ($paymentIntent->status !== 'requires_payment_method') { return $this->createNewPaymentIntent($customer);}With the current workflow, new payment intents have requires_payment_method status by default. Failed payment intents will have the same requires_payment_method status so they can be retried.
However, once required actions are handled, the PaymentIntent moves to processing. While for some payment methods (for example, cards) processing can be quick, other types of payment methods can take up to a few days to process.
Consider redirecting the user to the status page with the following logic when the status is processing.
if ($paymentIntent->status === 'processing') { return redirect()->route('filament.admin.pages.payment-status', [ 'payment_intent' => $paymentIntent->id, 'payment_intent_client_secret' => $paymentIntent->client_secret, 'redirect_status' => $paymentIntent->status, ]);}Also, depending on your business logic, if you allow multiple purchases of the same product, the succeeded status can be handled by issuing new intent or redirected in the same way when it is processing.
if ($paymentIntent->status === 'succeeded') { return $this->createNewPaymentIntent($customer);}Also, consider forbidding the user from visiting the checkout page if the product is already purchased or applying different strategies depending on the status.
Read more: Payment Intent Statuses
Creating a PaymentIntent is recommended as soon as we know the amount, such as when the customer begins the checkout process, to help track your sales funnel.
Now we can call getClientSecret() in the mount() method and expose $clientSecret to the front-end. This method will trigger the chain of events, and the PaymentIntent will be created even before rendering the payment form.
app/Filament/Resources/ProductResource/Pages/Checkout.php
public string $clientSecret; // ... public function mount(int | string $record): void{ // ... $this->checkoutKey = 'checkout.' . $this->record->id; $this->clientSecret = $this->getClientSecret(); }Use Stripe.js to remain PCI compliant by ensuring that payment details are sent directly to Stripe without hitting your server. Always load Stripe.js from js.stripe.com to remain compliant. Please don’t include the script in a bundle or host it yourself.
So, now we could include the script in the checkout.blade.php file, and of course, it would work.
<script src="https://js.stripe.com/v3/"></script>But there's a better way.
To best leverage Stripe’s advanced fraud functionality, we need to include this script on every page instead, not just the checkout page. That allows Stripe to detect suspicious behavior that may indicate fraud as customers browse your website.
We can register external scripts in Filament from a CDN on the AppServiceProvider@boot method.
app/Providers/AppServiceProvider.php
use Filament\Support\Assets\Js; use Filament\Support\Facades\FilamentAsset; // ... public function boot(): void{ FilamentAsset::register([ Js::make('stripe-js', 'https://js.stripe.com/v3/'), ]);}resources/views/filament/resources/product-resource/pages/checkout.blade.php
<x-filament-panels::page> <form id="payment-form" class="max-w-lg"> <div id="payment-element"> <!--Stripe.js injects the Payment Element--> </div> <x-filament::button id="submit" type="submit" class="w-full mt-2" size="xl"> <x-filament::loading-indicator class="h-5 w-5 hidden" id="spinner" /> <span id="button-text">Pay now</span> </x-filament::button> <div id="payment-message" class="hidden"></div> </form></x-filament-panels::page>Initialize Stripe.js with your publishable API keys. You’ll use Stripe.js to create the Payment Element and complete the payment on the client.
Then initialize the Stripe Elements UI library with the client secret. Elements manage the UI components you need to collect payment details.
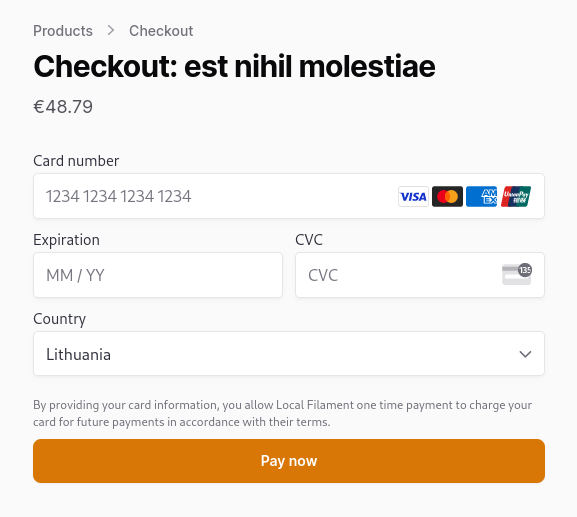
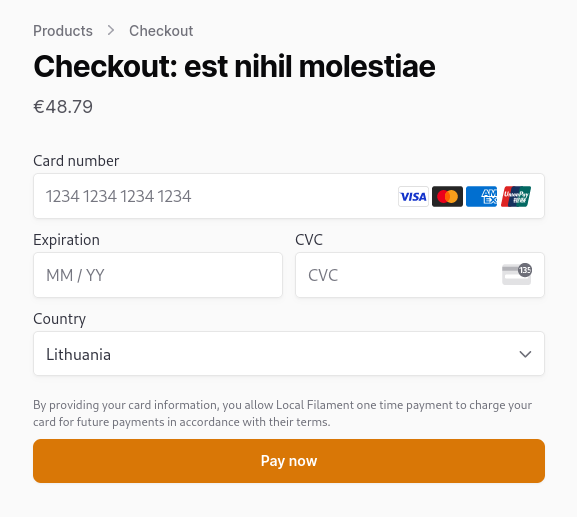
<x-filament-panels::page> <script> document.addEventListener("DOMContentLoaded", function(event) { const stripe = Stripe("{{ config('services.stripe.key') }}", { apiVersion: '2023-10-16' }); const elements = stripe.elements({ clientSecret: '{{ $clientSecret }}' }); const paymentElementOptions = { layout: "tabs" }; const paymentElement = elements.create("payment", paymentElementOptions); paymentElement.mount("#payment-element"); </script> <form id="payment-form" class="max-w-lg"> <!-- ... -->Now, you should be able to see the checkout form. Let's proceed to the next step.
Listen to the form’s submit event to know when to confirm the payment through the Stripe API.
resources/views/filament/resources/product-resource/pages/checkout.blade.php
// ... const paymentElement = elements.create("payment", paymentElementOptions);paymentElement.mount("#payment-element"); document.querySelector("#payment-form").addEventListener("submit", handleSubmit); async function handleSubmit(e) { e.preventDefault(); setLoading(true); const { error } = await stripe.confirmPayment({ elements, confirmParams: { return_url: "{{ route('filament.admin.pages.payment-status') }}", receipt_email: "{{ auth()->user()->email }}", }, }); if (error.type === "card_error" || error.type === "validation_error") { showMessage(error.message); } else { showMessage("An unexpected error occurred."); } setLoading(false);} // ...Call confirmPayment(), passing along the PaymentElement and a return_url to indicate where Stripe should redirect the user after they complete the payment. For payments that require authentication, Stripe displays a modal for 3D Secure authentication or redirects the customer to an authentication page depending on the payment method. After the customer completes the authentication process, they’re redirected to the return_url.
If there are any immediate errors (for example, your customer’s card is declined), Stripe.js returns an error. Show that error message to your customers so they can try again.
if (error.type === "card_error" || error.type === "validation_error") { showMessage(error.message);} else { showMessage("An unexpected error occurred.");}This point will only be reached if there is an immediate error when confirming the payment. Otherwise, your customer will be redirected to your return_url. For some payment methods like iDEAL, your customer will first be redirected to an intermediate site to authorize the payment, then redirected to the return_url.
Stripe can send an email receipt to your customer if you add the confirmParams.receipt_email parameter to the confirmPayment() method.
const { error } = await stripe.confirmPayment({ elements, confirmParams: { return_url: "{{ route('filament.admin.pages.payment-status') }}", receipt_email: "{{ auth()->user()->email }}", },});The fully implemented checkout page looks as follows.
resources/views/filament/resources/product-resource/pages/checkout.blade.php
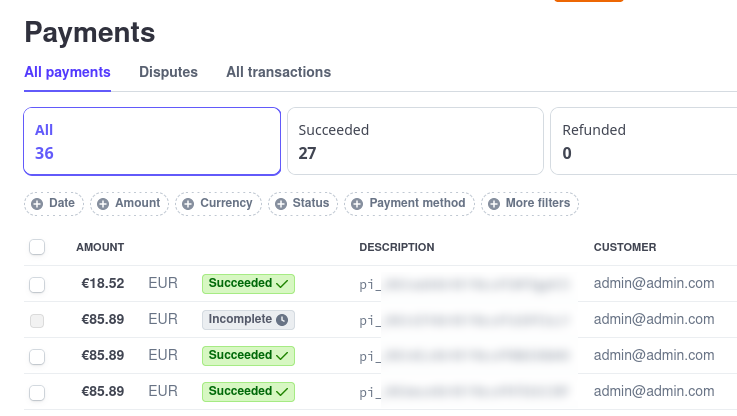
<x-filament-panels::page> <script> document.addEventListener("DOMContentLoaded", function(event) { const stripe = Stripe("{{ config('services.stripe.key') }}", { apiVersion: '2023-10-16' }); const elements = stripe.elements({ clientSecret: '{{ $clientSecret }}' }); const paymentElementOptions = { layout: "tabs" }; const paymentElement = elements.create("payment", paymentElementOptions); paymentElement.mount("#payment-element"); document.querySelector("#payment-form").addEventListener("submit", handleSubmit); async function handleSubmit(e) { e.preventDefault(); setLoading(true); const { error } = await stripe.confirmPayment({ elements, confirmParams: { return_url: "{{ route('filament.admin.pages.payment-status') }}", receipt_email: "{{ auth()->user()->email }}", }, }); if (error.type === "card_error" || error.type === "validation_error") { showMessage(error.message); } else { showMessage("An unexpected error occurred."); } setLoading(false); } function showMessage(messageText) { const messageContainer = document.querySelector("#payment-message"); messageContainer.classList.remove("hidden"); messageContainer.textContent = messageText; setTimeout(function() { messageContainer.classList.add("hidden"); messageContainer.textContent = ""; }, 4000); } function setLoading(isLoading) { if (isLoading) { document.querySelector("#submit").disabled = true; document.querySelector("#spinner").classList.remove("hidden"); document.querySelector("#button-text").classList.add("hidden"); } else { document.querySelector("#submit").disabled = false; document.querySelector("#spinner").classList.add("hidden"); document.querySelector("#button-text").classList.remove("hidden"); } } }); </script> <form id="payment-form" class="max-w-lg"> <div id="payment-element"> <!--Stripe.js injects the Payment Element--> </div> <x-filament::button id="submit" type="submit" class="w-full mt-2" size="xl"> <x-filament::loading-indicator class="h-5 w-5 hidden" id="spinner" /> <span id="button-text">Pay now</span> </x-filament::button> <div id="payment-message" class="hidden"></div> </form></x-filament-panels::page>Now, when payment succeeds, you will see successful transactions of your customers on the Payments page in your Stripe Dashboard.
When Stripe redirects the customer to the return_url, three query parameters are appended by Stripe.js.
payment_intent
payment_intent_client_secret
redirect_status
URL will look as follows.
/admin/payment-status?payment_intent=****&payment_intent_client_secret=****&redirect_status=succeededUse the payment_intent_client_secret parameter to retrieve the PaymentIntent to determine what to show to your customer.
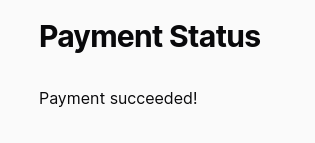
Update the payment-status.blade.php file with this content.
resources/views/filament/pages/payment-status.blade.php
<x-filament-panels::page> <script> document.addEventListener("DOMContentLoaded", function(event) { const stripe = Stripe("{{ config('services.stripe.key') }}", { apiVersion: '2023-10-16' }); checkStatus(); async function checkStatus() { const clientSecret = new URLSearchParams(window.location.search).get( "payment_intent_client_secret" ); if (!clientSecret) { return; } const { paymentIntent } = await stripe.retrievePaymentIntent(clientSecret); switch (paymentIntent.status) { case "succeeded": showMessage("Payment succeeded!"); break; case "processing": showMessage("Your payment is processing."); break; case "requires_payment_method": showMessage("Your payment was not successful, please try again."); break; default: showMessage("Something went wrong."); break; } } // ------- UI helpers ------- function showMessage(messageText) { const messageContainer = document.querySelector("#payment-message"); messageContainer.classList.remove("hidden"); messageContainer.textContent = messageText; } }); </script> <div id="payment-message" class="hidden"></div></x-filament-panels::page>Now that we can receive funds and notify users about payment results. What to do next? The next logical step would be to fulfill the order. That might mean you want to assign the user another role, give access to resources, etc.
Whatever your goal is, that often results in creating/updating some entries in the database about purchases.
First, we need a way to know what payment was for and by whom.
Through metadata, you can associate other information that’s meaningful to you with Stripe activity. For example, you can attach the order ID for your store to the PaymentIntent for that order.
In our case we will use the orders table to store only successful purchases, so instead we can attach product_id and user_id.
app/Filament/Resources/ProductResource/Pages/Checkout.php
protected function createNewPaymentIntent(Customer $customer): PaymentIntent{ $paymentIntent = $this->stripe->paymentIntents->create([ 'customer' => $customer->id, 'setup_future_usage' => 'off_session', 'amount' => $this->record->price, 'currency' => config('services.stripe.currency'), 'metadata' => [ 'product_id' => $this->record->id, 'user_id' => auth()->id(), ], ]); session([$this->checkoutKey => $paymentIntent->id]); return $paymentIntent;}This metadata will be available to process later when we receive an event to a webhook.
A webhook is an endpoint on your server that receives requests from Stripe, notifying you about events that happen, such as a successful payment.
First, let's create a new endpoint in your Stripe Dashboard. Navigate to Developers -> Webhook -> Add endpoint and enter the Endpoint URL with the /api/stripe/webhook path.
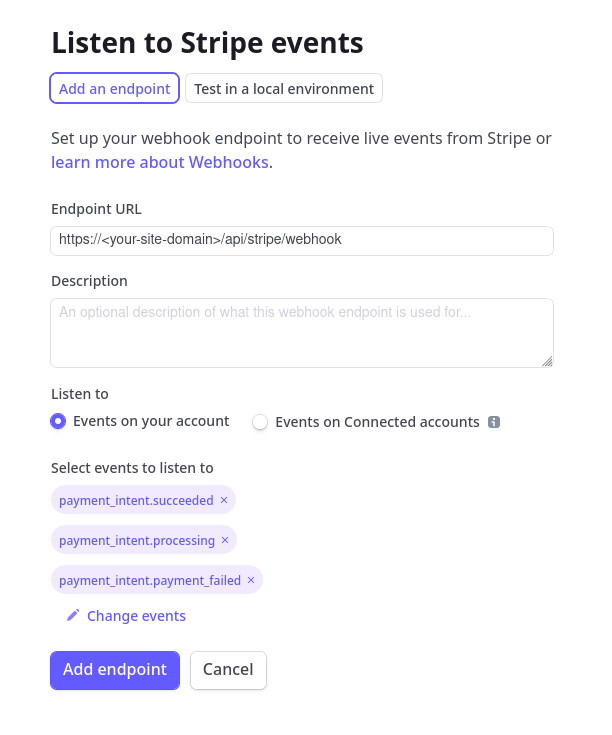
Stripe recommends listening to these events:
payment_intent.succeeded
payment_intent.processing
payment_intent.payment_failed
We added all of them for demonstration purposes to the list of events, but we will handle only the payment_intent.succeeded event. You should add only events you're going to handle.
Create a new API Controller.
php artisan make:controller Api/StripeWebhookControllerAnd register it in API routes. Make sure it is publicly accessible so it can receive unauthenticated POST requests.
routes/api.php
use App\Http\Controllers\Api\StripeWebhookController; Route::post('/stripe/webhook', [StripeWebhookController::class, 'handle']);You can use the Ngrok to forward webhook requests to your local machine.
Source of the fully implemented StripeWebhookController.
app/Http/Controllers/Api/StripeWebhookController.php
namespace App\Http\Controllers\API; use App\Http\Controllers\Controller;use App\Jobs\ProcessOrder;use Illuminate\Http\Request;use Stripe\Event;use Stripe\Exception\SignatureVerificationException;use Stripe\PaymentIntent;use Stripe\StripeClient;use Stripe\Webhook;use UnexpectedValueException; class StripeWebhookController extends Controller{ protected StripeClient $stripe; protected ?string $endpointSecret; public function __construct() { $this->stripe = new StripeClient(config('services.stripe.secret')); $this->endpointSecret = config('services.stripe.wh_secret'); } public function handle(Request $request) { try { $event = Event::constructFrom($request->toArray()); } catch (UnexpectedValueException $e) { abort(422, 'Webhook error while parsing basic request.'); } if ($this->endpointSecret) { // Only verify the event if there is an endpoint secret defined // Otherwise, use the basic decoded event try { $event = Webhook::constructEvent( payload: $request->getContent(), sigHeader: $request->header('stripe-signature'), secret: $this->endpointSecret ); } catch (SignatureVerificationException $e) { // Invalid payload abort(422, 'Webhook error while validating signature.'); } } match ($event->type) { 'payment_intent.succeeded' => $this->handlePaymentIntentSucceeded($event->data->object), // Define and call a method to handle the processing of payment intent. 'payment_intent.processing' => null, // Define and call a method to handle the failed payment. 'payment_intent.payment_failed' => null, // Unexpected event type default => report(new \Exception('Received unknown event type')), }; return response()->noContent(); } protected function handlePaymentIntentSucceeded(PaymentIntent $paymentIntent): void { ProcessOrder::dispatch($paymentIntent); }}When a request is received, the payload is parsed, and the Stripe\Event object will be returned. Then, we check $event->type and call the corresponding method.
Your endpoint must quickly return a successful status code (2xx) before any complex logic that could cause a timeout. Failed requests from Stripe will be retried later.
For example, you must return a response before updating data in your system. Due to this reason, we don't process data directly in the method we associated with the event type but call the Job instead.
protected function handlePaymentIntentSucceeded(PaymentIntent $paymentIntent): void{ ProcessOrder::dispatch($paymentIntent);}Let's create a ProcessOrder Job to store successful orders.
php artisan make:job ProcessOrderapp/Jobs/ProcessOrder.php
namespace App\Jobs; use App\Models\Order;use Illuminate\Bus\Queueable;use Illuminate\Contracts\Queue\ShouldBeUnique;use Illuminate\Contracts\Queue\ShouldQueue;use Illuminate\Foundation\Bus\Dispatchable;use Illuminate\Queue\InteractsWithQueue;use Illuminate\Queue\SerializesModels;use Stripe\PaymentIntent; class ProcessOrder implements ShouldQueue{ protected $paymentIntent; use Dispatchable, InteractsWithQueue, Queueable, SerializesModels; public function __construct(PaymentIntent $paymentIntent) { $this->paymentIntent = $paymentIntent; } public function handle(): void { $metadata = $this->paymentIntent->metadata; $amount = $this->paymentIntent->amount_received; Order::create([ 'product_id' => $metadata->product_id, 'user_id' => $metadata->user_id, 'amount' => $amount, ]); }}We run queues using redis. If you're not familiar with Laravel Queues, visit our Practical Laravel Queues on Live Server and Queues in Laravel courses.
.env
QUEUE_CONNECTION=redisYou can run Queue listener to process jobs with the queue:listen command.
php artisan queue:listen INFO Processing jobs from the [default] queue. 2023-11-15 19:52:58 App\Jobs\ProcessOrder .......................... RUNNING2023-11-15 19:52:58 App\Jobs\ProcessOrder ..................... 15.25ms DONEWhen we receive an event that is not in the match expression, we report() that Exception. The main difference between throwing and reporting exceptions is that the report() method won't interrupt code execution, and the endpoint can still return a successful 2xx response.
report(new \Exception('Received unknown event type'))Unknown events will still be logged or reported to services such as BugSnag. It would be best if you either implemented handling of such events or stopped listening for them on Stripe Dashboard.
Example error message:
Received unknown event type {"exception":"[object] (Exception(code: 0): Received unknown event type at app/Http/Controllers/StripeWebhookController.php:59)Since the endpoint is unauthenticated, we can verify the source of a webhook request to prevent bad actors from sending fake payloads. Secure your webhook with a client signature to validate that Stripe generated a webhook request and didn’t come from a server acting like Stripe.
Here's the section from the controller.
if ($this->endpointSecret) { try { $event = Webhook::constructEvent( payload: $request->getContent(), sigHeader: $request->header('stripe-signature'), secret: $this->endpointSecret ); } catch (SignatureVerificationException $e) { abort(422, 'Webhook error while validating signature.'); }}The webhook secret can be found on the webhook's page and starts with whsec_ under the Signing secret section next to the API version.

Add a new entry to the services configuration.
config/services.php
'stripe' => [ 'key' => env('STRIPE_KEY'), 'secret' => env('STRIPE_SECRET'), 'currency' => env('STRIPE_CURRENCY'), 'wh_secret' => env('STRIPE_WEBHOOK_SECRET'), ],And add a webhook secret to the environment file.
.env
STRIPE_WEBHOOK_SECRET=whsec_****So yeah, this long tutorial covers how to implement Stripe payments in Filament. Any questions?