This lesson will be a very important one. If you want to avoid accidentally wiping out your database data, carefully read this one.
As you saw in the previous lesson, we interact with the database, creating some "fake" data for testing, kinda like simulating the database.
For that, we must be very careful: our tests shouldn't interact with live databases. We need to configure a separate testing database where our tests would run.
When creating a new Laravel project, you can choose the testing framework. However, the configuration is made in the phpunit.xml file for both frameworks.
The database configuration is in two variables, DB_CONNECTION and DB_DATABASE, which are commented out by default.
phpunit.xml:
<?xml version="1.0" encoding="UTF-8"?><phpunit xmlns:xsi="http://www.w3.org/2001/XMLSchema-instance" xsi:noNamespaceSchemaLocation="./vendor/phpunit/phpunit/phpunit.xsd" bootstrap="vendor/autoload.php" colors="true"> <testsuites> <testsuite name="Unit"> <directory>tests/Unit</directory> </testsuite> <testsuite name="Feature"> <directory>tests/Feature</directory> </testsuite> </testsuites> <source> <include> <directory>app</directory> </include> </source> <php> <env name="APP_ENV" value="testing"/> <env name="APP_MAINTENANCE_DRIVER" value="file"/> <env name="BCRYPT_ROUNDS" value="4"/> <env name="CACHE_STORE" value="array"/> <!-- <env name="DB_CONNECTION" value="sqlite"/> --> <!-- <env name="DB_DATABASE" value=":memory:"/> --> <env name="MAIL_MAILER" value="array"/> <env name="PULSE_ENABLED" value="false"/> <env name="QUEUE_CONNECTION" value="sync"/> <env name="SESSION_DRIVER" value="array"/> <env name="TELESCOPE_ENABLED" value="false"/> </php></phpunit>So, uncomment those lines and specify the connection and the database where your tests should be run. You can check what connections are available in the config/database.php. For example, SQLite, mysql.
IMPORTANT: if you don't do that, any DB operations in your tests will execute on the LIVE database. So, please configure this BEFORE writing any tests.
In most cases, running tests using the SQLite connection and memory as the database is pretty safe. In this case, you wouldn't need to create a separate database with SQL client manually.
The Exception is if you use specific MySQL functions that SQLite doesn't support. For that case, manually create a separate MySQL database, call it something like db_testing, and configure its connection in the config/database.php.
In our case, we will proceed with SQLite. Uncomment those two lines in the phpunit.xml and re-run the tests. Now, tests are run in a separate database. By default, Pest has added the RefreshDatabase trait for all feature tests to run migrations after every test.
tests/Pest.php:
use Illuminate\Foundation\Testing\RefreshDatabase;use Tests\TestCase; uses(TestCase::class, RefreshDatabase::class)->in('Feature'); // ...Yes, that means that every time we run php artisan test, Pest will clean all the database and re-run migrations from scratch. This is precisely why you should use a separate database to avoid wiping the data in your main database.
Run the tests. They should be green.

If you look in the products table on your live database, you will see that no new records were added.
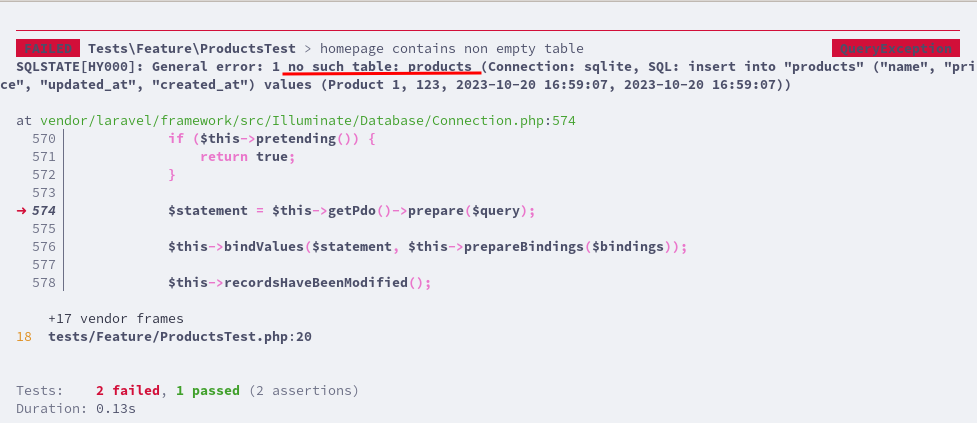
After setting up the testing database and running the tests, we will get an error no such table: products.

And of course. We specified a new connection and database but have not run the migrations. We must add the RefreshDatabase trait to every test class. This trait will re-run migration every time this test is run.
tests/Feature/ProductsTest.php:
use Illuminate\Foundation\Testing\RefreshDatabase; class ProductsTest extends TestCase{ use RefreshDatabase; // ...}In addition to phpunit.xml, there is another way to configure the env variables. Like in the .env file, you can create a separate .env.testing file.
Comment out the DB configuration in the phpunit.xml file. Create a new file .env.testing with the same content as in .env.
Now we can change the DB connection and database in the .env.testing. When the tests are run, the DB connection settings will be taken from .env.testing.
.env.testing:
APP_NAME=LaravelAPP_ENV=testing [tl! highlight]APP_KEY=base64:Oo7mTQpSW00WmjWs1kJVjqFZw/oQVENUxyhuyLCQgfk=APP_DEBUG=trueAPP_URL=http://localhost LOG_CHANNEL=stackLOG_LEVEL=debug DB_CONNECTION=sqlite DB_HOST=127.0.0.1DB_PORT=3306DB_DATABASE=:memory: DB_USERNAME=rootDB_PASSWORD= // ...It's your preference whether to use phpunit.xml or .env.testing.
So, this is how you configure the database for performing operations inside the testing methods.