
For file uploads, there's a very popular JavaScript library called FilePond. How to use it in Laravel? We'll talk about using it in create/edit forms, previewing the images, and then will try to use tools like Spatie Media Library, Amazon S3 and Livewire. So, let's get into it!
Step-by-step, we will cover these topics:
First, let's set up the scene: we'll be working with a simple Task form with fields title and image:
Migration structure:
database/migrations/xxxx_create_tasks_table.php:
return new class extends Migration { public function up() { Schema::create('tasks', function (Blueprint $table) { $table->id(); $table->string('title'); $table->string('image'); $table->timestamps(); }); }};Controller method for this form will be as simple as this:
app/Http/Controllers/TasksController.php:
class TasksController extends Controller{ public function create() { return view('tasks.create'); } public function store(TaskRequest $request) { Task::create($request->validated()); return redirect()->route('tasks.index'); }}For the front-end part, we will use Laravel Breeze as a starter kit, with its Blade components, the code is this:
resources/views/tasks/create.blade.php:
<x-app-layout> <x-slot name="header"> <h2 class="font-semibold text-xl text-gray-800 leading-tight"> {{ __('Create Task') }} </h2> </x-slot> <div class="py-12"> <div class="max-w-7xl mx-auto sm:px-6 lg:px-8"> <div class="bg-white overflow-hidden shadow-sm sm:rounded-lg"> <div class="overflow-hidden overflow-x-auto p-6 bg-white border-b border-gray-200"> <x-validation-errors class="mb-4" :errors="$errors"/> <form action="{{ route('tasks.store') }}" method="POST"> @csrf <div> <x-label for="title" :value="__('Title')"/> <x-input id="title" class="block mt-1 w-full" type="text" name="title" :value="old('title')" /> </div> <div class="mt-4"> <x-label for="image" :value="__('Image')" /> <input id="image" class="block mt-1 w-full" type="file" name="image" /> </div> <x-button class="mt-4"> {{ __('Submit') }} </x-button> </form> </div> </div> </div> </div></x-app-layout>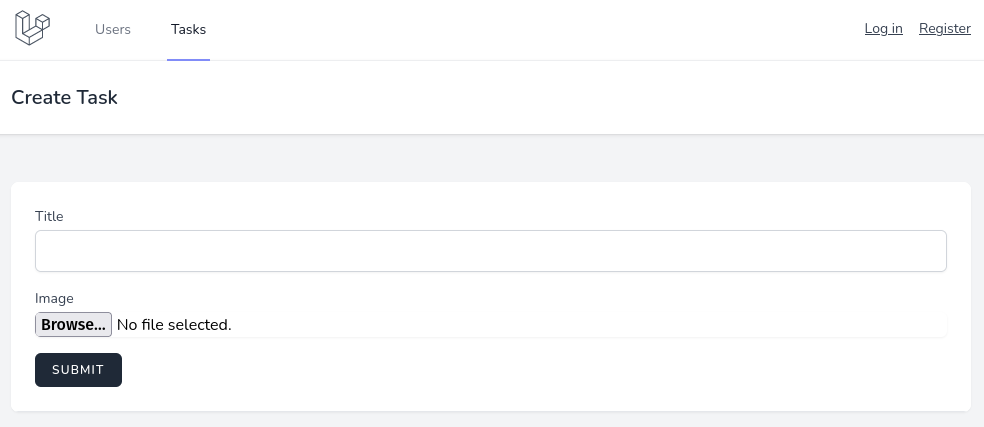
Before using FilePond, we need to add it to our code globally, to the main layout. First, in resources/views/layouts/app.blade.php, before @vite() Blade directive, add @stack('styles'), and before </body> HTML tag add @stack('scripts').
<!DOCTYPE html><html lang="{{ str_replace('_', '-', app()->getLocale()) }}">// @stack('styles') @vite(['resources/css/app.css', 'resources/js/app.js']) // @stack('scripts') </body></html>Now, in our form View resources/views/tasks/create.blade.php before </x-app-layout> tag we will import FilePond from CDN:
@push('styles') <link href="https://unpkg.com/filepond@^4/dist/filepond.css" rel="stylesheet" /> <link href="https://unpkg.com/filepond-plugin-image-preview/dist/filepond-plugin-image-preview.css" rel="stylesheet" /> @endpush @push('scripts') <script src="https://unpkg.com/filepond-plugin-file-validate-type/dist/filepond-plugin-file-validate-type.js"></script> <script src="https://unpkg.com/filepond-plugin-image-preview/dist/filepond-plugin-image-preview.js"></script> <script src="https://unpkg.com/filepond@^4/dist/filepond.js"></script> <script> FilePond.registerPlugin(FilePondPluginImagePreview); FilePond.registerPlugin(FilePondPluginFileValidateType); </script> @endpush</x-app-layout>As you can see, we also add two plugins. One will validate the file type, and another will show the image preview when uploading.
Now you should see FilePond instead of a plain input.
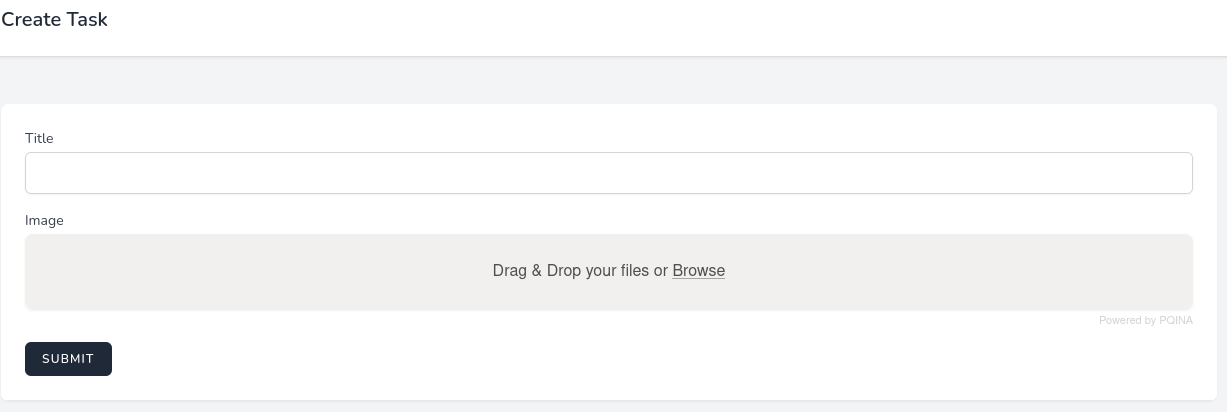
But it doesn't work, it won't process the upload yet. Let's work on that part.
Now that we have our file input, we need to tell FilePond to use it. In the <script> part after FilePond plugins, add this code:
resources/views/tasks/create.blade.php:
const inputElement = document.querySelector('#image'); const pond = FilePond.create(inputElement, { acceptedFileTypes: ['image/*'], server: { process: '{{ route('upload') }}', revert: '{{ route('revert') }}', headers: { 'X-CSRF-TOKEN': '{{ csrf_token() }}' } }});A few things here.
First, we add our file input for which we have ID of image to variable inputElement.
Then, we create FilePond with a few parameters:
acceptedFileTypes validation from first plugin. You can check more in the documentation
process route handles file uploadrevert route handles file when pressed remove buttonNow, as you see, we have two new route endpoints: upload and revert. Let's add them to the routes.
routes/web.php:
Route::post('upload', [TasksController::class, 'upload'])->name('upload');Route::delete('revert', [TasksController::class, 'revert'])->name('revert');And we add those two methods to the Controller.
app/Http/Controllers/TasksController.php:
public function upload(Request $request){ if ($request->file('image')) { $path = $request->file('image')->store('tmp', 'public'); } return $path;} public function revert(Request $request){ Storage::disk('public')->delete($request->getContent());}What these methods do:
upload() as it says in its name uploads file to public disk in tmp directory.revert() deletes file from public disk.In other words, FilePond will upload a temporary file into a temporary location, before the full form is submitted.
Now, we just need to save that image when the submit button is pressed. Here's the store() method of the Controller.
app/Http/Controllers/TasksController.php:
public function store(TaskRequest $request){ $newFilename = Str::after($request->input('image'), 'tmp/'); Storage::disk('public')->move($request->input('image'), "images/$newFilename"); Task::create(['title' => $request->input('title'), 'image' => "images/$newFilename"]); return redirect()->route('tasks.index');}What it does?
And that's it for the general FilePond upload. Of course, in your project it may be a different logic for file locations, filenames and other settings, but you get the idea.
Now, let's work on the edit form, and specifically on showing the previously uploaded image in there.
First, we initialize FilePond identically to the create form. So, repeat everything from the resources/views/tasks/create.blade.php and copy it to resources/views/tasks/edit.blade.php.
Now, let's make the image preview show up.
In resources/views/tasks/edit.blade.php we need to add this code to the <script> part.
const pond = FilePond.create(inputElement, { acceptedFileTypes: ['image/*'], server: { load: (source, load, error, progress, abort, headers) => { const myRequest = new Request(source); fetch(myRequest).then((res) => { return res.blob(); }) .then(load); }, process: '{{ route('upload') }}', revert: '{{ route('revert') }}', headers: { 'X-CSRF-TOKEN': '{{ csrf_token() }}' } }, files: [ { source: '{{ Storage::disk('public')->url($task->image) }}', options: { type: 'local', }, } ],});As you can see, to we added new server -> load parameter which loads all images from the request.
Also added a new files option. Important part is to set type: 'local'. This tells FilePond that file is local and doesn't need to be uploaded.
For the backend part, the update() method of the Controller looks like this:
app/Http/Controllers/TasksController.php:
public function update(TaskRequest $request, Task $task){ if (str()->afterLast($request->input('image'), '/') !== str()->afterLast($task->image, '/')) { Storage::disk('public')->delete($task->image); $newFilename = Str::after($request->input('image'), 'tmp/'); Storage::disk('public')->move($request->input('image'), "images/$newFilename"); } $task->update(['title' => $request->input('title'), 'image' => isset($newFilename) ? "images/$newFilename" : $task->image]); return redirect()->route('tasks.index');}This new code in update() method checks if image from the request isn't the same as the old image. If it's not, then it deletes the old image and puts the new one to public disk images directory, also updating image column in DB.
Let's make another step further and try to upload multiple files, with the same one FilePond input element.
First, database structure. We cannot save multiple images to one string column. So for that, we will create a new model TaskImage with migration.
php artisan make:model TaskImage -mdatabase/migrations/xxxx_create_task_images_table.php:
return new class extends Migration { public function up() { Schema::create('task_images', function (Blueprint $table) { $table->id(); $table->foreignId('task_id')->constrained(); $table->string('image'); $table->timestamps(); }); }};app/Models/TaskImage.php:
class TaskImage extends Model{ protected $fillable = ['task_id', 'image'];}And we need to add HasMany relation to Task model.
app/Models/Task.php:
public function images(): HasMany{ return $this->hasMany(TaskImage::class);}Now, for the front-end part, in both resources/views/tasks/create.blade.php and resources/views/tasks/edit.blade.php in scripts part after acceptedFileTypes add:
allowMultiple: true,And file input name needs to be changed to array, from image to image[]
resources/views/tasks/create.blade.php and resources/views/tasks/edit.blade.php:
<input id="image" class="block mt-1 w-full" type="file" name="image[]" />Also, for edit form, we need to show all images, so in the scripts part, files parameter will look like:
resources/views/tasks/edit.blade.php:
files: @json($images),As you see, we pass all images as one variable $images. Here's how it will look from the Controller.
app/Http/Controllers/TasksController.php:
public function edit(Task $task) { $images = $task->images->map(function ($image) { return [ 'source' => $image->image, 'options' => [ 'type' => 'local' ] ]; }); return view('tasks.edit', compact('task', 'images')); }Now that we are uploading multiple files, the upload() method the Controller needs to be changed to this.
app/Http/Controllers/TasksController.php:
public function upload(Request $request){ $path = []; if ($request->file('image')) { foreach ($request->file('image') as $file) { $path = $file->store('tmp', 'public'); } } return $path;}When creating the task, we also need to go through each file and move it to the "images" directory.
app/Http/Controllers/TasksController.php:
public function store(TaskRequest $request){ $newFiles = []; if ($request->input('image')) { foreach ($request->input('image') as $file) { $newFilename = Str::after($file, 'tmp/'); Storage::disk('public')->move($file, "images/$newFilename"); $newFiles[] = ['image' => "images/$newFilename"]; } } $task = Task::create(['title' => $request->input('title')]); $task->images()->createMany($newFiles); return redirect()->route('tasks.index');}For update, it's more tricky.
First, let's update the update() method of the Controller, and then I'll explain.
app/Http/Controllers/TasksController.php:
public function update(TaskRequest $request, Task $task){ $task->images->filter(function ($value) use ($request) { return ! in_array($value->image, $request->input('image')); })->each(function ($image) { Storage::disk('public')->delete($image->image); $image->delete(); }); $task->update(['title' => $request->input('title')]); $files = []; $newImages = array_diff($request->input('image'), $task->images->pluck('image')->toArray()); foreach ($newImages as $file) { $newFilename = Str::after($file, 'tmp/'); Storage::disk('public')->move($file, "images/$newFilename"); $files[] = ['image' => "images/$newFilename"]; } foreach ($files as $file) { $task->images()->updateOrCreate(['image' => $file['image']]); } return redirect()->route('tasks.index');}So what happens in the update() method:
task_images table.Until now, we haven't used any packages for file upload. But what if you want to use a popular Spatie Laravel Medialibrary?
Let's follow the installation instructions, and start by installing it:
composer require spatie/laravel-medialibraryphp artisan vendor:publish --provider="Spatie\MediaLibrary\MediaLibraryServiceProvider" --tag="migrations"php artisan migratephp artisan vendor:publish --provider="Spatie\MediaLibrary\MediaLibraryServiceProvider" --tag="config"Next, we need to prepare our Task Model to use package by implementing HasMedia interface and adding InteractsWithMedia trait.
app/Models/Task.php:
class Task extends Model implements HasMedia{ use InteractsWithMedia; protected $fillable = ['title'];}Now we need to update the Controller to use methods from package.
app/Http/Controllers/TasksController.php:
public function store(TaskRequest $request){ $task = Task::create(['title' => $request->input('title')]); foreach ($request->input('image') as $file) { $task->addMediaFromDisk($file, 'public')->toMediaCollection(); } return redirect()->route('tasks.index');}For edit() method, we will get all files from relation using getMedia(), and to get full URL package has method for that called getFullUrl().
app/Http/Controllers/TasksController.php:
public function edit(Task $task){ $images = $task->getMedia()->map(function ($image) { return [ 'source' => $image->getFullUrl(), 'options' => [ 'type' => 'local', ] ]; }); return view('tasks.edit', compact('task', 'images'));}And for the update() method, we also need to filter which files to delete. But since now we use a package for handling file storage, we now have different paths. So for every check, we need to change the path.
app/Http/Controllers/TasksController.php:
public function update(TaskRequest $request, Task $task){ $task->getMedia()->filter(function ($value) use ($request) { return ! in_array(Str::after($value->getPath(), 'public/'), $request->input('image')); })->each(function ($image) { $image->delete(); }); $task->update(['title' => $request->input('title')]); $newImages = array_diff($request->input('image'), $task->getMedia()->map(fn ($media) => $media->id . '/' . $media->file_name)->toArray()); foreach ($newImages as $file) { $task->addMediaFromDisk($file, 'public')->toMediaCollection(); } return redirect()->route('tasks.index');}Also, we will add passedValidation() method to the Form Request, which will change request input image. It will remove the full domain and storage from value. For example, http://project.test/storage/1/KtXGjP0PgtOgdexVPG1RPgzHYQSs8dJZHi9KOrXW.png will become 1/KtXGjP0PgtOgdexVPG1RPgzHYQSs8dJZHi9KOrXW.png.
app/Http/Requests/TaskRequest.php:
public function passedValidation(){ $newImageValues = []; foreach ($this->image as $value) { $newImageValues[] = Str::after($value, 'storage/'); } $this->merge(['image' => $newImageValues]);}And that's it, now we implemented the Media Library for the uploads.
Next, how do we upload the files to a remote popular Amazon S3 storage, instead of our local disk?
First, I will show you how to create a so-called "Bucket" on S3.
Go to S3 AWS Console -> Buckets and press the Create bucket button.

Choose your bucket's name, I will name it laraveldailyimages. And choose your AWS Region, I will choose eu-north-1. Everything else you can leave as default, and at the bottom press the Create bucket.
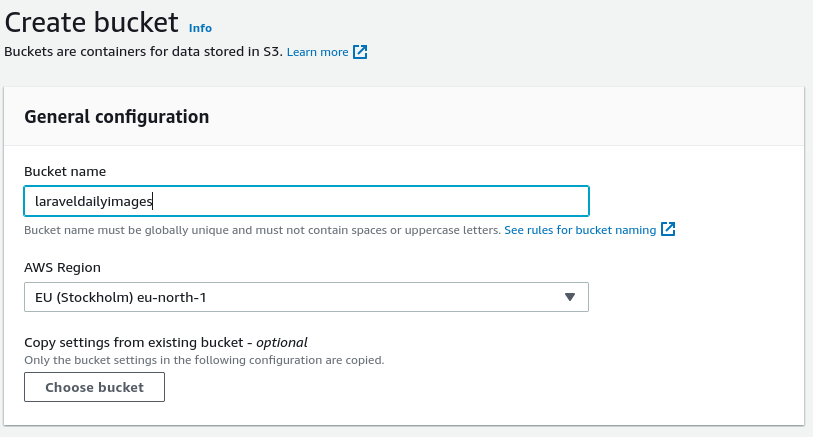
Now you are inside your bucket. Press Permissions tab, and at the bottom you will see Cross-origin resource sharing (CORS). Press Edit there.


Add CORS:
[ { "AllowedHeaders": [ "*" ], "AllowedMethods": [ "PUT", "POST", "DELETE" ], "AllowedOrigins": [ "http://project.test" ], "ExposeHeaders": [] }]In AllowedOrigins, put the URL of your project - the same as in your .env variable APP_URL. And save changes.
Next, we need to attach a user to have access to our created bucket. In the top right corner, press your username and go to security credentials. From there, go to Users and Add users.
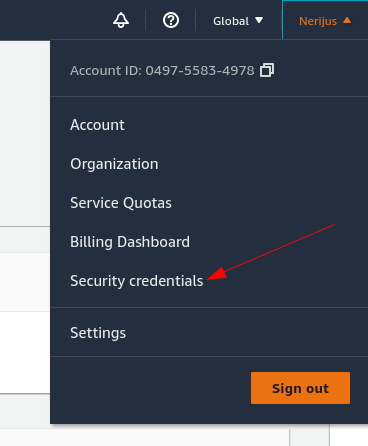
Now we need to choose new user's name, I will name it filepond and select Access key - Programmatic access for Select AWS credential type.
For permissions, select Attach existing policies directly and select AmazonS3FullAccess:
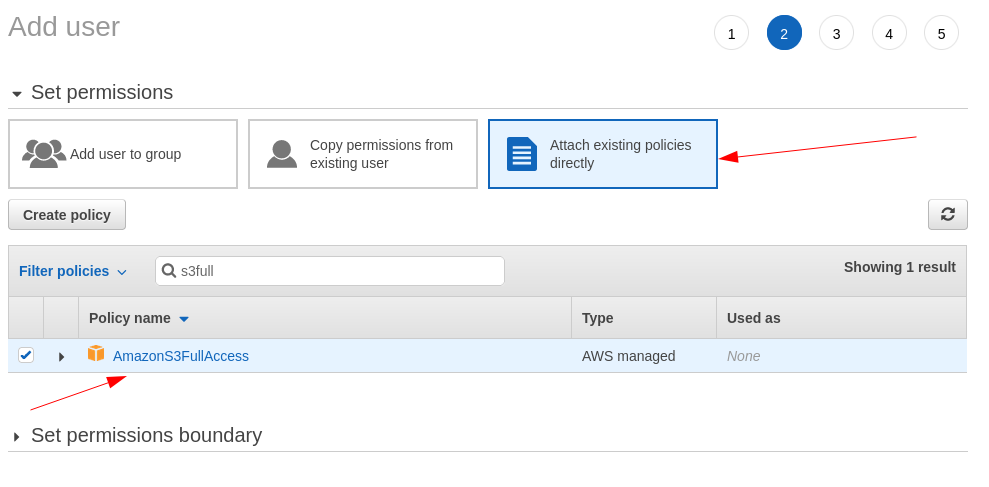
Press Next for other steps.
Next part is very important because you won't see secret key again. And you need to put it into your Laravel .env file:
AWS_ACCESS_KEY_ID=COPY_YOUR_ACCESS_KEY_ID_HEREAWS_SECRET_ACCESS_KEY=COPY_YOUR_SECRET_ACCESS_KEY_HEREAWS_DEFAULT_REGION=eu-north-1AWS_BUCKET=laraveldailyimagesAfter setting everything for S3 bucket, now we can set the default filesystem for our project to s3. This can be done in .env by setting FILESYSTEM_DRIVER to s3.
FILESYSTEM_DRIVER=s3For that to work in Laravel, we need to install a specific package:
composer require league/flysystem-aws-s3-v3Now, for the actual uploading and reverting files in Laravel code, the framework is flexible so it is just as easy as providing a disk parameter with s3 value.
app/Http/Controllers/TasksController.php:
public function upload(Request $request){ $path = []; if ($request->file('image')) { foreach ($request->file('image') as $file) { $path = $file->store('tmp', 's3'); } } return $path;} public function revert(Request $request){ Storage::disk('s3')->delete($request->getContent());}If you use Spatie Media Library package, you also need to tell it about S3. Add this new value to the .env file:
MEDIA_DISK=s3Similar change for creating tasks - we can just use the package method addMediaFromDisk() and provide s3 as a disk name:
app/Http/Controllers/TasksController.php:
public function store(TaskRequest $request){ $task = Task::create(['title' => $request->input('title')]); foreach ($request->input('image') as $file) { $task->addMediaFromDisk($file, 's3')->toMediaCollection(); } return redirect()->route('tasks.index');}For getting images in update form, the only change is the source, now we need to use getTemporaryUrl() method with setting the time.
app/Http/Controllers/TasksController.php:
public function edit(Task $task){ $images = $task->getMedia()->map(function ($image) { return [ 'source' => $image->getTemporaryUrl(Carbon::now()->addMinutes(5)), 'options' => [ 'type' => 'local', ] ]; }); return view('tasks.edit', compact('task', 'images'));}As for updating task, again first we need to modify values we get from Form Request for image after validation:
app/Http/Requests/TaskRequest.php:
public function passedValidation(){ $newImageValues = []; foreach ($this->image as $value) { $newImageValues[] = Str::of($value)->after('amazonaws.com/')->before('?')->toString(); } $this->merge(['image' => $newImageValues]);}For the update part we are doing the same as in previous part, filtering which ones to delete, updating task itself, and adding new images if there are any.
app/Http/Controllers/TasksController.php:
public function update(TaskRequest $request, Task $task){ $task->getMedia()->filter(function ($value) use ($request) { return ! in_array($value->id . '/' . $value->file_name, $request->input('image')); })->each(function ($image) { $image->delete(); }); $task->update(['title' => $request->input('title')]); $newImages = collect($request->input('image')) ->filter(function ($value) { return Str::contains($value, 'tmp/'); }); foreach ($newImages as $file) { $task->addMediaFromDisk($file, 's3')->toMediaCollection(); } return redirect()->route('tasks.index');}As you can see, majority of those changes are just specifying the s3 disk, with some small tweaks on top.
If you want to use Laravel Livewire in your form, it has a great feature of Uploading Directly to S3 which means that temporary files will also be stored on S3, instead of your local server.
Notice: Livewire doesn't support multiple files upload directly to S3, so for this example we get back to the single file form.
First, we need to install Livewire.
composer require livewire/livewireAnd add the following Blade directives in the head tag, and before the end body tag in your template.
<html><head> // ... @livewireStyles</head> <body> // ... @livewireScripts</body></html>Publish livewire config files
php artisan livewire:publish --configWe need to tell Livewire to upload directly to s3, that can be done in its config:
config/livewire.php:
// 'temporary_file_upload' => [ 'disk' => 's3',//Now let's create a Livewire component where all the logic will be.
php artisan make:livewire TaskFormNow that we have livewire component, we can call it in the tasks create and edit pages.
resources/views/tasks/create.blade.php:
<x-app-layout> <x-slot name="header"> <h2 class="font-semibold text-xl text-gray-800 leading-tight"> {{ __('Create Task') }} </h2> </x-slot> @livewire('task-form')</x-app-layout>resources/views/tasks/edit.blade.php:
<x-app-layout> <x-slot name="header"> <h2 class="font-semibold text-xl text-gray-800 leading-tight"> {{ __('Edit Task') }} </h2> </x-slot> @livewire('task-form', [$task])</x-app-layout>As you can see, we will be using the same component for create and edit.
Also, now app/Http/Controllers/TasksController.php controller doesn't need store(), update(), upload() and revert() methods, because saving to DB will be handled in the Livewire component. And create() and edit() method can be simplified to only show view.
app/Http/Controllers/TasksController.php:
public function create(){ return view('tasks.create');} public function edit(Task $task){ return view('tasks.edit', compact('task'));}Let's move on to our TaskForm livewire component, which can be found in app\Http\Livewire. First, to be able to upload files, we need to add WithFileUploads trait.
app/Http/Livewire/TaskForm.php:
class TaskForm extends Component{ use WithFileUploads; // ...}For this example, we need to add two properties:
app/Http/Livewire/TaskForm.php:
public Task $task; public $image;Before we can use the $task property, we need to initialize it in the mount() method:
app/Http/Livewire/TaskForm.php:
public function mount(Task $task){ $this->task = $task;}Now we will attach properties to inputs in the Blade file, and initialize FilePond.
resources/views/livewire/task-form.blade.php:
@push('styles') <link href="https://unpkg.com/filepond@^4/dist/filepond.css" rel="stylesheet" /> <link href="https://unpkg.com/filepond-plugin-image-preview/dist/filepond-plugin-image-preview.css" rel="stylesheet" />@endpush <div class="py-12"> <div class="max-w-7xl mx-auto sm:px-6 lg:px-8"> <div class="bg-white overflow-hidden shadow-sm sm:rounded-lg"> <div class="overflow-hidden overflow-x-auto p-6 bg-white border-b border-gray-200"> <form wire:submit.prevent="save" method="POST"> @csrf <div> <x-label for="title" :value="__('Title')" /> <x-input wire:model="task.title" id="title" class="block mt-1 w-full" type="text" name="title" :value="old('title')" /> @error('task.title') <span class="text-sm text-red-600 mb-1">{{ $message }}</span> @enderror </div> <div wire:ignore class="mt-4" x-data x-init="() => { FilePond.create($refs.filepond, { acceptedFileTypes: ['image/*'], server: { load: (source, load, error, progress, abort, headers) => { const myRequest = new Request(source); fetch(myRequest).then((res) => { return res.blob(); }) .then(load); }, process: (fieldName, file, metadata, load, error, progress, abort, transfer, options) => { @this.upload('image', file, load, error, progress) }, revert: (filename, load) => { @this.removeUpload('image', filename, load) } }, @if($task->hasMedia()) files: [{ source: '{{ $task->getFirstTemporaryUrl(now()->addMinutes(5)) }}', options: { type: 'local' } }] @endif }) }"> <x-label for="image" :value="__('Image')" /> <x-input id="image" class="block mt-1 w-full" type="file" x-ref="filepond" /> </div> @error('image') <div class="text-sm text-red-600 mb-1">{{ $message }}</div> @enderror <x-button class="mt-4"> {{ __('Submit') }} </x-button> </form> </div> </div> </div></div> @push('scripts') <script src="https://unpkg.com/filepond-plugin-file-validate-type/dist/filepond-plugin-file-validate-type.js"></script> <script src="https://unpkg.com/filepond-plugin-image-preview/dist/filepond-plugin-image-preview.js"></script> <script src="https://unpkg.com/filepond@^4/dist/filepond.js"></script> <script> FilePond.registerPlugin(FilePondPluginImagePreview); FilePond.registerPlugin(FilePondPluginFileValidateType); </script>@endpushAs you can see, our form isn't much different from before. Just some parts go into different places.
We first use wire:model for data binding for the task title:
resources/views/livewire/task-form.blade.php:
<x-input wire:model="task.title" id="title" class="block mt-1 w-full" type="text" name="title" :value="old('title')" />Next, a very important part is to use wire:ignore so that Livewire would ignore DOM changes.
Moving on, x-data and x-init are from Alpine.js, but as you can see in x-init, it's the same code as it was in <script> part. Also, don't worry, Alpine.js comes with Laravel Breeze by default.
The only difference is instead of document.querySelector('#image') to get input, we use Alpine.js x-ref.
// ... FilePond.create($refs.filepond, {// ... <input id="image" class="block mt-1 w-full" type="file" x-ref="filepond" />Now, for uploading and reverting, Livewire has JavaScript Upload API.
Uploads image and binds it to $image property:
@this.upload('image', file, load, error, progress)Removes image from $image property:
@this.removeUpload('image', filename, load)Of course, we want to submit the form to the Livewire component:
<form wire:submit.prevent="save" method="POST">So, after pressing the Submit button, Livewire will use save() method in its component. Let's create it.
app/Http/Livewire/TaskForm.php:
public function save(){ $this->validate(); $this->task->save(); if ($this->image) { $this->task->clearMediaCollection(); } $this->task->addMediaFromDisk($this->image->path(), 's3')->toMediaCollection(); return redirect()->route('tasks.index');}What we do in the save() method:
Final part - the validation. At the bottom of theTaskForm component, add new method rules() with this array.
app/Http/Livewire/TaskForm.php:
protected function rules(): array{ return [ 'task.title' => ['required', 'string'], 'image' => ['required', 'image'] ];}That's it, your Livewire component should work!
So, this is the end of this long article, hopefully now you can use FilePond in your Laravel projects. But if you still have any questions, use the comment form below!