There are many customer support chat solutions, but sometimes you need something simple. For that, we can use Reverb and create a chat around it:

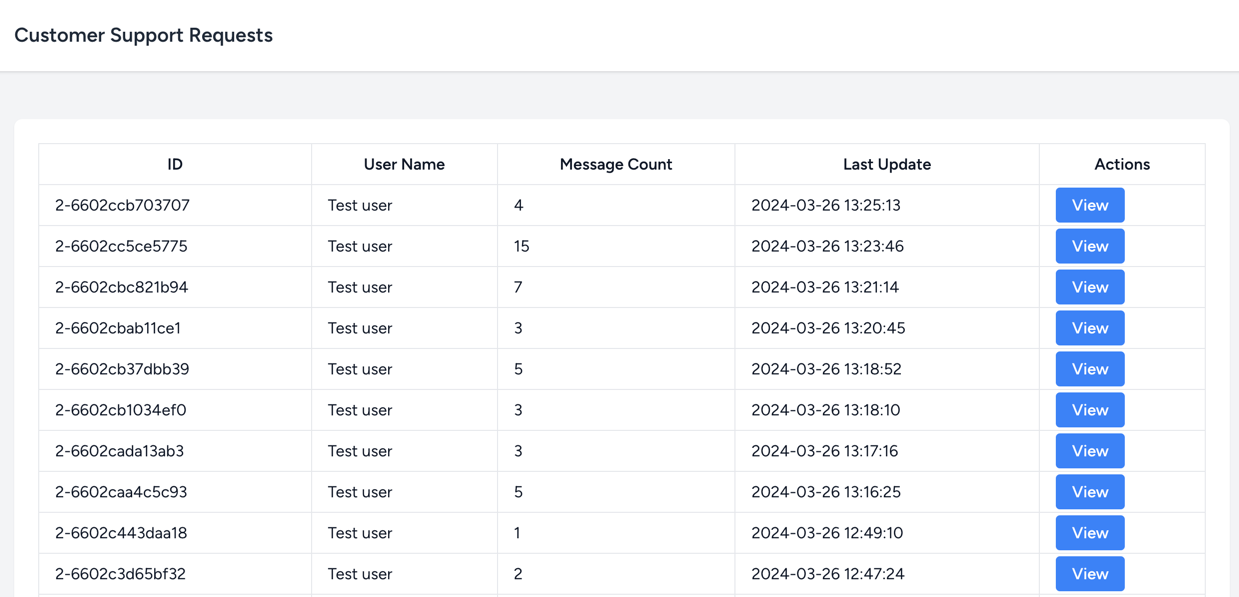
On the admin side, the administrator user will be able to see the chat requests and reply to them:

With this solution, we don't need to use any third-party free/paid software. We also have complete control over how it works/looks of what happens. Finally, all the data stays on our servers.
Our demo project contains two critical parts in the application:
On the user side - we have a chatbox that will be used to send messages to the support team:

Chatbox has this code inside:
Note: Repository is linked at the end of the tutorial.
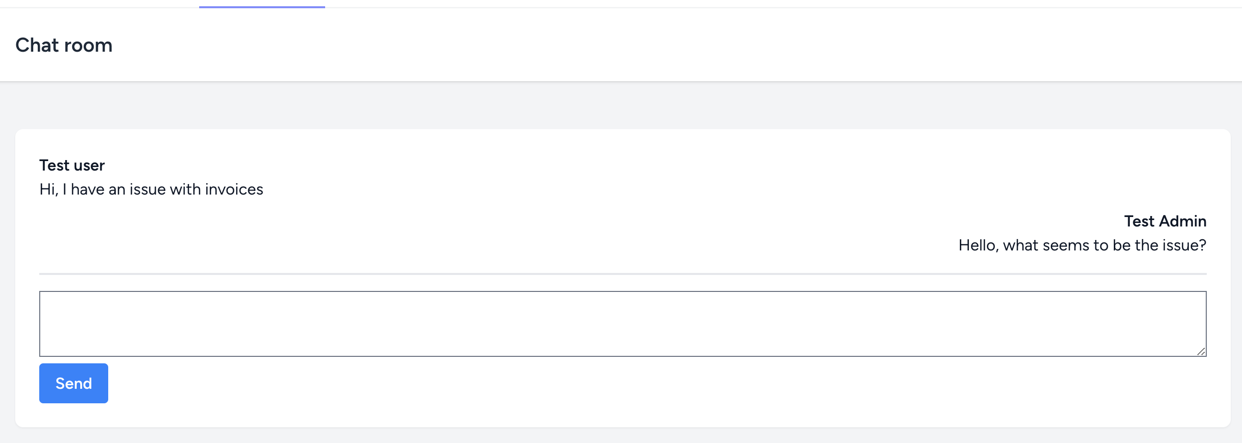
<div class="fixed bottom-2 right-2 bg-blue-900 rounded-xl" style="width: 64px; height: 64px;"> <button id="chatbox-button" class="mx-auto flex justify-center items-center " style="width: 64px; height: 64px;"> </button></div><div id="chatbox-container" class="hidden fixed bottom-24 right-2 bg-gray-200 border-2 border-blue-400" style="min-width: 400px; max-width: 30%; height: 600px"> <div class="p-6 flex flex-col justify-between h-full"> <div class="pb-4 mb-4 border-b-2 border-b-gray-400"> <h2 class="text-2xl text-center">Chat with Customer Support</h2> </div> <div class="overflow-y-scroll h-full" id="messagesList"> <div class=""> <div class="font-bold">System</div> <p> Hello, how can we help you? </p> </div> </div> <div class="pt-4 mt-4 border-t-2 border-t-gray-400"> <textarea id="message" class="w-full"></textarea> <button id="sendMessage" class="w-full bg-blue-300 py-2">Send Message</button> </div> </div></div> <script type="text/html"> <div class="_POSITION_"> <div class="font-bold">_SENDER_</div> <p>MESSAGE</p> </div></script> <script> const MESSAGE_ICON = ` <svg xmlns="http://www.w3.org/2000/svg" width="32" height="32" viewBox="-3 -2 32 32" fill="none" stroke="#FFFFFF" stroke-width="2" stroke-linecap="round" stroke-linejoin="round" class="feather feather-mail p-0 m-0"> <path d="M4 4h16c1.1 0 2 .9 2 2v12c0 1.1-.9 2-2 2H4c-1.1 0-2-.9-2-2V6c0-1.1.9-2 2-2z"></path> <polyline points="22,6 12,13 2,6"></polyline> </svg>`; const CLOSE_ICON = ` <svg xmlns="http://www.w3.org/2000/svg" width="32" height="32" viewBox="-3 -2 32 32" fill="#FFFFFF" stroke="#FFFFFF" stroke-width="2" stroke-linecap="round" stroke-linejoin="round" class="feather feather-x p-0 m-0"> <line x1="18" y1="6" x2="6" y2="18"></line> <line x1="6" y1="6" x2="18" y2="18"></line> </svg>`; // Set the session identifier // This acts as "rooms" for now, and will be cleared on page refresh let identifier = '{{ auth()->id() }}-{{ uniqid() }}'; // Add default chatbox button icon as soon as page loads const chatboxButton = document.getElementById('chatbox-button'); chatboxButton.innerHTML = MESSAGE_ICON; // Add event listener to chatbox button (open/close chatbox) document.getElementById('chatbox-button').addEventListener('click', function () { const chatboxContainer = document.getElementById('chatbox-container'); chatboxContainer.classList.toggle('hidden'); if (chatboxContainer.classList.contains('hidden')) { chatboxButton.innerHTML = MESSAGE_ICON; } else { chatboxButton.innerHTML = CLOSE_ICON; } }) // Send the message on sendMessage button click document.getElementById('sendMessage').addEventListener('click', function () { const message = document.getElementById('message').value; const messagesList = document.getElementById('messagesList'); const messageTemplate = document.querySelector('script[type="text/html"]').innerHTML; // Post the message to the server fetch('{{ route('send-message') }}', { method: 'POST', headers: { 'Content-Type': 'application/json', 'X-CSRF-TOKEN': document.querySelector('meta[name="csrf-token"]').getAttribute('content') }, body: JSON.stringify({message: message, identifier: identifier}) }) .then(() => { const newMessage = messageTemplate .replace('_POSITION_', 'text-right') .replace('_SENDER_', 'You') .replace('MESSAGE', message); messagesList.innerHTML += newMessage; messagesList.scrollTop = messagesList.scrollHeight; document.getElementById('message').value = ''; }); });</script>On the support side (admin), we have a list of all user-created chat rooms. From there, we can go inside the chat room and see all the messages that were sent:

We are simply using a controller and a table to display all the chat rooms:
app/Http/Controllers/CustomerChatsController.php
// ... public function index(){ $chatRooms = ChatRoom::query() ->with(['user']) ->withCount('chatMessages') ->orderBy('updated_at', 'desc') ->paginate(15); return view('chatRooms.index', compact('chatRooms'));} // ...resources/views/chatRooms/index.blade.php
{{-- ... --}} <table class="w-full"> <thead> <tr> <th class="border px-4 py-2">ID</th> <th class="border px-4 py-2">User Name</th> <th class="border px-4 py-2">Message Count</th> <th class="border px-4 py-2">Last Update</th> <th class="border px-4 py-2">Actions</th> </tr> </thead> <tbody> @foreach ($chatRooms as $chatRoom) <tr> <td class="border px-4 py-2">{{ $chatRoom->identifier }}</td> <td class="border px-4 py-2">{{ $chatRoom->user->name }}</td> <td class="border px-4 py-2">{{ $chatRoom->chat_messages_count }}</td> <td class="border px-4 py-2">{{ $chatRoom->updated_at }}</td> <td class="border px-4 py-2"> <a href="{{ route('chatRooms.show', $chatRoom->id) }}" class="bg-blue-500 hover:bg-blue-700 text-white font-bold py-2 px-4 rounded">View</a> </td> </tr> @endforeach </tbody></table> {{-- ... --}}
The chat room has this code inside:
app/Http/Controllers/CustomerChatsController.php
// ... public function show(ChatRoom $chatRoom){ $chatRoom->load(['chatMessages', 'chatMessages.user']); return view('chatRooms.show', compact('chatRoom'));} // ...resources/views/chatRooms/show.blade.php
{{-- ... --}} <div class="p-6 text-gray-900 dark:text-gray-100"> <div class=""> @foreach($chatRoom->chatMessages as $message) <div class="mb-2 @if($chatRoom->user_id != $message->user_id) text-right @endif"> <span class="font-bold">{{ $message->user->name }}</span> <p>{{ $message->message }}</p> </div> @endforeach <div id="chat-messages"></div> </div> <div class="mt-4 pt-4 border-t-2"> <textarea class="w-full" id="reply"></textarea> <button class="bg-blue-500 hover:bg-blue-700 text-white font-bold py-2 px-4 rounded" id="send"> Send </button> </div></div> {{-- ... --}} <script type="text/html"> <div class="mb-2 _POSITION_"> <span class="font-bold">_NAME_</span> <p>_MESSAGE_</p> </div></script> <script> // On reply click send the message document.getElementById('send').addEventListener('click', function () { let message = document.getElementById('reply').value; fetch('{{ route('admin-reply', $chatRoom->id) }}', { method: 'POST', headers: { 'Content-Type': 'application/json', 'X-CSRF-TOKEN': document.querySelector('meta[name="csrf-token"]').getAttribute('content') }, body: JSON.stringify({ message: message }) }) .then(data => { // Push the message to the chat let template = document.querySelector('script[type="text/html"]').innerHTML; template = template.replace('_POSITION_', 'text-right'); template = template.replace('_NAME_', '{{ auth()->user()->name }}'); template = template.replace('_MESSAGE_', message); document.getElementById('chat-messages').innerHTML += template; document.getElementById('reply').value = ''; }); });</script>{{-- ... --}}Both parts are static and require a page refresh to see new messages from the other person. Let's change that and make it real-time using Reverb.
To install Reverb, we have to call this command:
php artisan install:broadcastingThis will ask us if we want to install Reverb, enter yes and press Enter.
Once the package installs - it will ask if we want Node dependencies to be installed. Enter yes and press Enter.
That's it! Reverb is installed and ready to be used. No more configuration is needed at this point.
Now that we have Reverb installed, we can work on the live chat feature. To do this, we will need to add a few more things to our project:
Let's start by adding our channels:
use App\Models\ChatRoom; // ... Broadcast::channel('adminRepliedToChatRoom.{identifier}', function ($user, $identifier) { $chatRoom = ChatRoom::where('identifier', $identifier)->first(); if (!$chatRoom) { return true; } return ChatRoom::where('identifier', $identifier)->where('user_id', $user->id)->exists();}); Broadcast::channel('userRepliedToChatRoom.{identifier}', function ($user, $identifier) { return $user->is_admin;});The idea here is that users can only listen to the userRepliedToChatRoom channel if they are an admin. The user can only listen to the adminRepliedToChatRoom channel if they are the user who created the chat room.
From here, we need to create the events:
php artisan make:event AdminSentChatMessageEventphp artisan make:event UserSentChatMessageEventNext, we need to modify these events:
app/Events/AdminSentChatMessageEvent.php
namespace App\Events; use Illuminate\Broadcasting\InteractsWithSockets;use Illuminate\Broadcasting\PrivateChannel;use Illuminate\Contracts\Broadcasting\ShouldBroadcast;use Illuminate\Foundation\Events\Dispatchable; class AdminSentChatMessageEvent implements ShouldBroadcast{ use Dispatchable; use InteractsWithSockets; public function __construct(public string $identifier, public string $message) { } public function broadcastOn() { return [ new PrivateChannel('adminRepliedToChatRoom.' . $this->identifier), ]; }}app/Events/UserSentChatMessageEvent.php
namespace App\Events; use App\Models\ChatMessage;use Illuminate\Broadcasting\InteractsWithSockets;use Illuminate\Broadcasting\PrivateChannel;use Illuminate\Contracts\Broadcasting\ShouldBroadcast;use Illuminate\Foundation\Events\Dispatchable; class UserSentChatMessageEvent implements ShouldBroadcast{ use Dispatchable; use InteractsWithSockets; public function __construct(public ChatMessage $chatMessage) { $this->chatMessage->load(['chatRoom', 'user']); } public function broadcastOn() { return [ new PrivateChannel('userRepliedToChatRoom.' . $this->chatMessage->chatRoom->id), ]; }}Both receive information about the chatroom and the ability to broadcast to the correct channel.
Now, we want to call these events when a message is sent:
app/Http/Controllers/SendMessageController.php
use App\Events\UserSentChatMessageEvent;use App\Models\ChatRoom;use Illuminate\Http\Request; class SendMessageController extends Controller{ public function __invoke(Request $request) { $message = $request->input('message'); $identifier = $request->input('identifier'); $chatRoom = ChatRoom::query() ->where('user_id', auth()->id()) ->where('identifier', $identifier) ->first(); if (!$chatRoom) { $chatRoom = ChatRoom::create([ 'user_id' => auth()->id(), 'identifier' => $identifier ]); } $message = $chatRoom->chatMessages()->create([ 'user_id' => auth()->id(), 'message' => $message ]); event(new UserSentChatMessageEvent($message)); return response()->json([], 201); }}app/Http/Controllers/AdminMessageReplyController.php
namespace App\Http\Controllers; use App\Events\AdminSentChatMessageEvent;use App\Models\ChatRoom;use Illuminate\Http\Request; class AdminMessageReplyController extends Controller{ public function __invoke(Request $request, ChatRoom $chatRoom) { $message = $request->input('message'); $chatRoom->chatMessages()->create([ 'user_id' => auth()->id(), 'message' => $message ]); event(new AdminSentChatMessageEvent($chatRoom->identifier, $message)); return response()->json([], 201); }}Once this is done, we will trigger the broadcast event when a message is sent. Now, we need to listen for these events in our JavaScript.
Note: Keep in mind that if your Queue driver is not sync - you must run php artisan queue:listen to listen to the events.
Let's start by adding the user-facing JavaScript:
resources/views/chatbox.blade.php
{{-- ... --}} window.addEventListener('DOMContentLoaded', function () { // Listen for events via echo window.Echo.private('adminRepliedToChatRoom.' + identifier) .listen('AdminSentChatMessageEvent', (e) => { const messagesList = document.getElementById('messagesList'); const messageTemplate = document.querySelector('script[type="text/html"]').innerHTML; const newMessage = messageTemplate .replace('_POSITION_', 'text-left') .replace('_SENDER_', 'Customer Support') .replace('MESSAGE', e.message); messagesList.innerHTML += newMessage; messagesList.scrollTop = messagesList.scrollHeight; });});</script>This will listen for the AdminSentChatMessageEvent event and add the message to the chatbox messages list. Next, we need to add the admin-facing JavaScript:
resources/views/chatRooms/show.blade.php
{{-- ... --}} window.addEventListener('DOMContentLoaded', function () { // Listen for new messages window.Echo.private('userRepliedToChatRoom.{{ $chatRoom->id }}') .listen('UserSentChatMessageEvent', (e) => { let template = document.querySelector('script[type="text/html"]').innerHTML; template = template.replace('_POSITION_', ''); template = template.replace('_NAME_', e.chatMessage.user.name); template = template.replace('_MESSAGE_', e.chatMessage.message); document.getElementById('chat-messages').innerHTML += template; });});</script></x-app-layout>It does the same thing as the user-facing JavaScript but instead listens for the UserSentChatMessageEvent event.
To test this, we need to have two browsers open. One for the user and one for the admin (you can use the same user, but it might cause some issues!).
When the user sends a message - it should appear in the chat room for the admin. When the admin sends a message, it should appear in the user's chat box.
Note: We recommend you use the complete code example to test this feature. Two users are set up in the database (found in the database/seeders/DatabaseSeeder.php file).
The complete code for this tutorial can be found at this repository