;-(2).png-674b51d50de6d.jpg)
When working with shops and e-commerce projects, one common question is how to structure the DB of products with all attributes, variants, and options, like "iPhone - Black - 2 GB RAM - 1 TB Storage". In this tutorial, we will show our version of doing that.
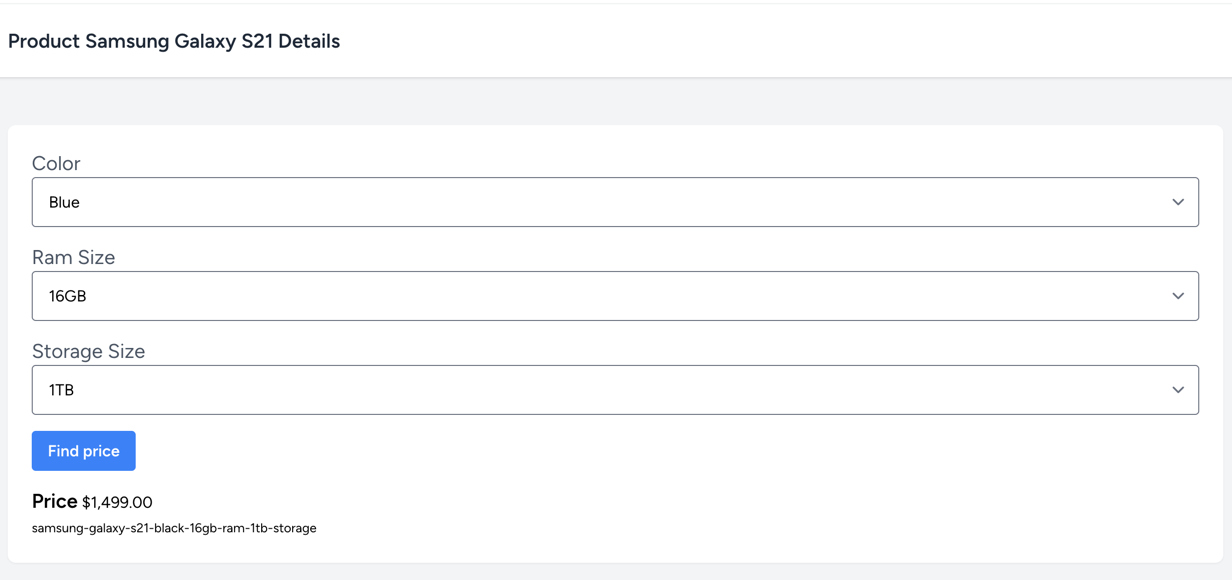
Here's the visual product page we will get by the end of this tutorial:

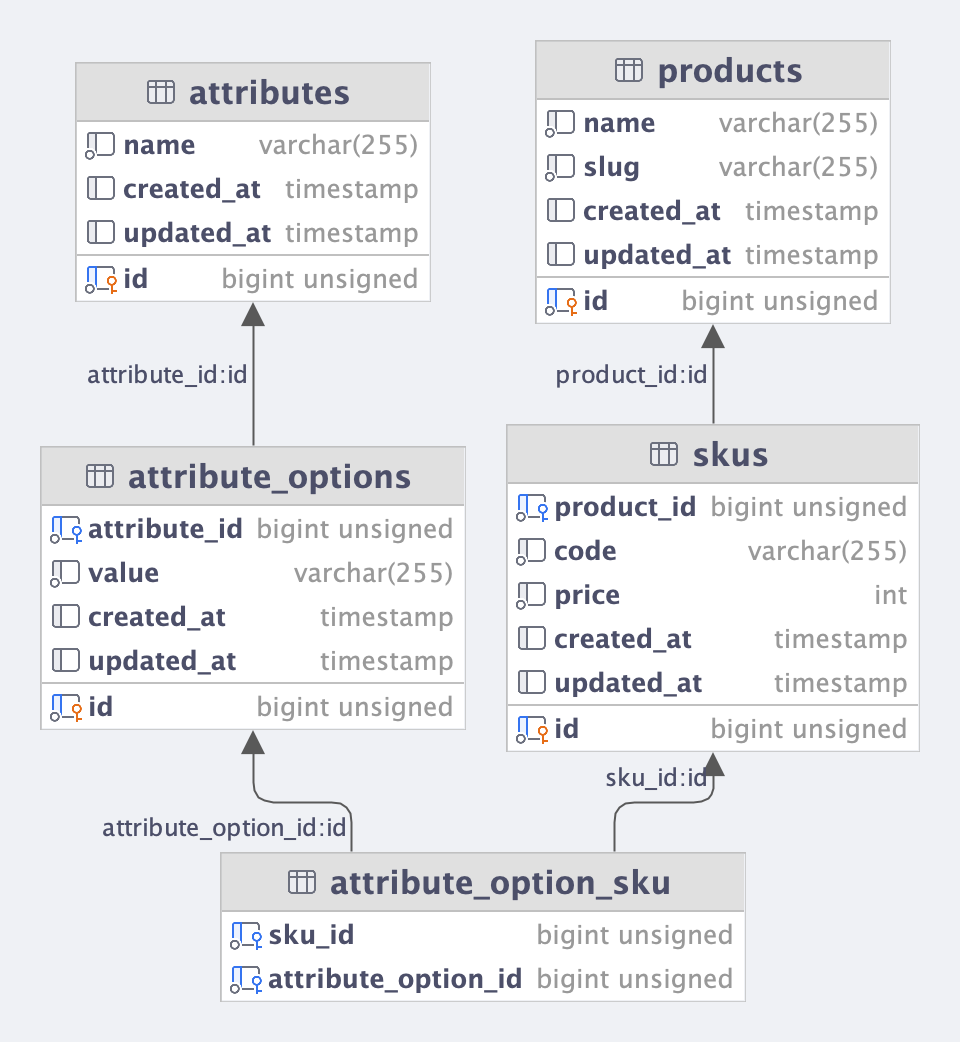
First, let's look at all the DB Schema, and we will dive into its details individually.

Initially, it might confuse you about what's going on, but it's pretty simple:
products In this table, we'll store global product information. For example, product name and description.SKUs Here, we will store all the information about a specific product variation. For example, price, stock, images, etc.attributes This table will store all the available attributes to be selected. For example, color, size, etc.attribute_options This table will store each attribute's available values. For example, red, blue, green, etc.attribute_option_sku Is our last table that will tie everything together. It will connect a specific attribute value and a specific SKU.Our example below will use a simplified version with minimal fields for each table. You can always add more fields to each table to fit your needs.
Let's start by creating our attributes table:
Schema::create('attributes', static function (Blueprint $table) { $table->id(); $table->string('name'); $table->timestamps();});With its Model:
app/Models/Attribute.php
use Illuminate\Database\Eloquent\Relations\HasMany;// ... class Attribute extends Model{ protected $fillable = [ 'name', ]; public function attributeOptions(): HasMany { return $this->hasMany(AttributeOption::class); }}Next, we'll create our attribute_options table:
Schema::create('attribute_options', static function (Blueprint $table) { $table->id(); $table->foreignId('attribute_id')->constrained(); $table->string('value'); $table->timestamps();});With its Model:
app/Models/AttributeOption.php
use Illuminate\Database\Eloquent\Relations\BelongsTo;// ... class AttributeOption extends Model{ protected $fillable = [ 'attribute_id', 'value', ]; public function attribute(): BelongsTo { return $this->belongsTo(Attribute::class); }}Now we are ready for our products table:
Schema::create('products', static function (Blueprint $table) { $table->id(); $table->string('name'); $table->string('slug'); $table->timestamps();});And its Model:
app/Models/Product.php
// ...use Illuminate\Database\Eloquent\Relations\HasMany; class Product extends Model{ protected $fillable = [ 'name', 'slug', ]; public function skus(): HasMany { return $this->hasMany(Sku::class); }}Next, we'll create our skus table:
Schema::create('skus', static function (Blueprint $table) { $table->id(); $table->foreignId('product_id')->constrained(); $table->string('code'); $table->integer('price'); $table->timestamps();});With its Model:
app/Models/Sku.php
// ...use Illuminate\Database\Eloquent\Casts\Attribute;use Illuminate\Database\Eloquent\Relations\BelongsTo;use Illuminate\Database\Eloquent\Relations\BelongsToMany; class Sku extends Model{ protected $fillable = [ 'product_id', 'code', 'price', ]; protected function price(): Attribute { return Attribute::make( get: static fn($value) => $value / 100, set: static fn($value) => $value * 100, ); } public function product(): BelongsTo { return $this->belongsTo(Product::class); } public function attributeOptions(): BelongsToMany { return $this->belongsToMany(AttributeOption::class); }}And finally, we'll create our attribute_option_sku pivot table:
Schema::create('attribute_option_sku', static function (Blueprint $table) { $table->foreignId('sku_id')->constrained(); $table->foreignId('attribute_option_id')->constrained();});That's it. We now have our database ready for action!
We have the DB schema. Let's test it with a few actual products. As an example, I've chosen two phone models: "Samsung Galaxy S21" and "iPhone 14 MAX", with three different attributes: "Color", "RAM" and "Storage".
First, we need to seed all the attributes with their possible option values. Let's generate a new Seeder class for it:
php artisan make:seeder AttributeSeederI've chosen these values for attributes. Let's just insert them all with options in a DB transaction:
database/seeders/AttributeSeeder.php:
use App\Models\Attribute; class AttributeSeeder extends Seeder{ public function run(): void { $attributes = [ [ 'name' => 'Color', 'values' => ['Red', 'Blue', 'Green', 'Black', 'White', 'Yellow'], ], [ 'name' => 'RAM', 'values' => ['2GB', '4GB', '8GB', '16GB'], ], [ 'name' => 'Storage', 'values' => ['32GB', '64GB', '128GB', '256GB', '512GB', '1TB'], ], ]; foreach ($attributes as $attribute) { DB::transaction(function() use ($attribute) { $createdAttribute = Attribute::create(['name' => $attribute['name']]); foreach ($attribute['values'] as $value) { $createdAttribute->attributeOptions()->create(['value' => $value]); } }); } }}Running this will create Color, RAM, and Storage attributes with their respective values.
Next, we need to seed all the products with their SKUs that contain those attribute values.
Another Seeder for this:
php artisan make:seeder ProductSeederFor products, I have an array of their name and possible combination of options that would form an SKU.
Then, we create each product and iterate through SKUs finding the attribute and assigning its value.
To avoid errors and DB inconsistency, we're doing it in a DB transaction and throwing an error if we don't find some attribute or its value from a previous seeder above.
namespace Database\Seeders; use App\Models\Attribute;use App\Models\AttributeOption;use App\Models\Product; // ... class ProductSeeder extends Seeder{ public function run(): void { $attributesByName = Attribute::pluck('id', 'name')->toArray(); $products = [ [ 'name' => 'Samsung Galaxy S21', 'SKUs' => [ [ 'price' => 349, 'attributes' => [ 'Color' => 'Red', 'RAM' => '2GB', 'Storage' => '32GB' ], ], [ 'price' => 349, 'attributes' => [ 'Color' => 'Green', 'RAM' => '4GB', 'Storage' => '32GB' ], ], [ 'price' => 349, 'attributes' => [ 'Color' => 'Yellow', 'RAM' => '8GB', 'Storage' => '32GB' ], ], [ 'price' => 1099, 'attributes' => [ 'Color' => 'Blue', 'RAM' => '8GB', 'Storage' => '512GB' ], ], [ 'price' => 1499, 'attributes' => [ 'Color' => 'Black', 'RAM' => '16GB', 'Storage' => '1TB' ], ], ] ], [ 'name' => 'iPhone 14 MAX', 'SKUs' => [ [ 'price' => 449, 'attributes' => [ 'Color' => 'Red', 'RAM' => '2GB', 'Storage' => '32GB' ], ], [ 'price' => 449, 'attributes' => [ 'Color' => 'Green', 'RAM' => '4GB', 'Storage' => '32GB' ], ], [ 'price' => 449, 'attributes' => [ 'Color' => 'Yellow', 'RAM' => '8GB', 'Storage' => '32GB' ], ], [ 'price' => 1299, 'attributes' => [ 'Color' => 'Blue', 'RAM' => '8GB', 'Storage' => '512GB' ], ], [ 'price' => 1999, 'attributes' => [ 'Color' => 'Blue', 'RAM' => '16GB', 'Storage' => '512GB' ], ], ] ] ]; foreach ($products as $product) { DB::transaction(function () use ($product, $attributesByName) { $DBProduct = Product::create([ 'name' => $product['name'], 'slug' => str($product['name'])->slug() ]); foreach ($product['SKUs'] as $sku) { $skuCode = str($product['name']); $skuOptions = []; foreach ($sku['attributes'] as $name => $value) { $skuCode .= ' ' . $value . ' ' . $name; if (!array_key_exists($name, $attributesByName)) { $this->command->error('Attribute ' . $name . ' not found'); return; } $attributeOption = AttributeOption::where('attribute_id', $attributesByName[$name])->where('value', $value)->value('id'); if (!$attributeOption) { $this->command->error('Attribute Value ' . $name . ' => ' . $value . ' not found'); return; } $skuOptions[] = $attributeOption; } $sku = $DBProduct->skus()->create([ 'code' => str()->slug($skuCode), 'price' => $sku['price'] ]); $sku->attributeOptions()->attach($skuOptions); } }); } }}There are some things to unpack here:
str()->slug($skuCode) - with the str() helper we automatically generate a code/slug for each SKUAttributeOption::where('attribute_id', $attributesByName[$name])->where('value', $value)->value('id')
This approach is quite flexible. You can easily add more products to the $products array. You just need to make sure that SKU attributes contain names and values that exist in the DB.
Now, let's add both seeder classes into the main DatabaseSeeder:
database/seeders/DatabaseSeeder.php:
class DatabaseSeeder extends Seeder{ public function run(): void { $this->call(AttributeSeeder::class); $this->call(ProductSeeder::class); }}And run the migrations with seeds:
php artisan migrate --seedAs a result, our products are seeded with their respective SKUs and attribute options that we can use in the UI.
This is what the table skus looks like:

Now, let's create a product page where the user would choose the attributes and see the price.
On the pages of real e-shops, it would be done with some dynamic component using Vue/Livewire, but in our tutorial the focus is on the back-end and DB schema, so we will perform a simple "old school" page refresh with form submit, after choosing the attributes.

This has a few crucial things going on:
Let's see how we can do that.
Let's generate a Controller with just one method, show(), that would use Route Model Binding.
php artisan make:controller ProductControllerapp/Http/Controllers/ProductController.php
namespace App\Http\Controllers; use App\Models\Product;use Illuminate\Http\Request; class ProductController extends Controller{ public function show(Request $request, Product $product) { // Loads the product // TODO: load possible attributes // TODO: calculate price from $request parameters return view('products.show', compact('product')); } }And the route looks like this:
routes/web.php
Route::get('products/{product:slug}', [ProductController::class, 'show']) ->name('products.show');As you can see, we're using a Product slug as a part of the URL, like most e-shops would do, for SEO purposes.
So our typical URL would be: /products/samsung-galaxy-s21. It would show the form with all attributes and submit to the same URL, just with GET parameters.
Our next goal is to show all dropdown inputs for all possible attributes.
Not only that, we need to show only the attributes that have at least one option for our chosen product.
That's why we need two collections/arrays: $attributes and $options, coming from the Controller. To get the second one, we will create a separate private method.
app/Http/Controllers/ProductController.php
use App\Models\Attribute;use App\Models\Product;use Illuminate\Http\Request; class ProductController extends Controller{ public function show(Request $request, Product $product) { $attributes = Attribute::pluck('name', 'id'); $options = $this->getSelectableOptionsFromProduct($product); return view('products.show', compact('product', 'attributes', 'options')); } private function getSelectableOptionsFromProduct(Product $product): array { $product->load([ 'skus.attributeOptions.attribute' ]); $allOptions = []; foreach ($product->skus as $sku) { foreach ($sku->attributeOptions->groupBy('attribute_id') as $attributeID => $options) { $allOptions[$attributeID][] = $options->toArray(); } } foreach ($allOptions as $attribute => $options) { // Cleaning up the array // to make sure we don't have duplicate values $allOptions[$attribute] = collect($options) ->flatten(1) ->unique('id') ->toArray(); } return $allOptions; }}We use groupBy to group the options by attribute ID, then flatten the variety to ensure we don't have duplicate values.
And then, in Blade, we display the form listing all possible attribute options:
resources/views/products/show.blade.php
<x-app-layout> <x-slot name="header"> <h2 class="font-semibold text-xl text-gray-800 leading-tight"> {{ __('Product :product Details', ['product' => $product->name]) }} </h2> </x-slot> <div class="py-12"> <div class="max-w-7xl mx-auto sm:px-6 lg:px-8"> <div class="bg-white overflow-hidden shadow-sm sm:rounded-lg"> <div class="p-6"> <form action="{{ route('products.show', $product->slug) }}" method="GET"> @foreach($attributes as $id => $name) @if(isset($options[$id])) <div class="mb-4"> <label class="text-xl text-gray-600"> {{ $name }} </label> <select name="attributes[{{ $id }}]" class="block appearance-none w-full bg-grey-lighter border border-grey-lighter text-grey-darker py-3 px-4 pr-8 rounded" required> @foreach($options[$id] as $option) <option value="{{ $option['id'] }}" @selected(request()->query('attributes') && $option['id'] == request()->query('attributes', '')[$id])> {{ $option['value'] }} </option> @endforeach </select> </div> @endif @endforeach <div class="mb-4"> <button type="submit" class="bg-blue-500 hover:bg-blue-700 text-white font-bold py-2 px-4 rounded"> Find price </button> </div> </form> </div> </div> </div> </div></x-app-layout>Crucial parts are these:
@foreach($attributes as $id => $name) ... @if(isset($options[$id])) - we loop through the attributes but show only those that have at least one possible option in our product<select name="attributes[{{ $id }}]" we will pass the ID-value pairs as array parameters to GET request@foreach($options[$id] as $option) ... @selected(request()->query('attributes') && $option['id'] == request()->query('attributes', '')[$id]) - for showing the actively chosen option value from attributes parameter.Now, as a result of submitting this form, we will get a URL like this: /products/samsung-galaxy-s21?attributes[1]=1&attributes[2]=7&attributes[3]=11
The final step: let's find the price by that combination.
In Controller, we create another private method to find the price and add its result to the compact() of the primary method.
app/Http/Controllers/ProductController.php
use App\Models\Attribute;use App\Models\Product;use Illuminate\Database\Eloquent\Builder;use Illuminate\Http\Request; class ProductController extends Controller{ public function show(Request $request, Product $product) { $attributes = Attribute::pluck('name', 'id'); $options = $this->getSelectableOptionsFromProduct($product); $price = $this->calculatePrice($product, $request); return view('products.show', compact('product', 'attributes', 'options', 'price')); } private function calculatePrice(Product $product, Request $request): ?array { $price = null; if ($request->filled('attributes')) { $price = [ 'found' => false, 'price' => null, 'sku' => null ]; $skuQuery = $product->skus()->where(function ($q) use ($request) { foreach ($request->input('attributes', []) as $attribute => $option) { $q->whereHas('attributeOptions', function (Builder $q) use ($attribute, $option) { return $q->where('id', $option) ->where('attribute_id', $attribute); }); } }); if ($sku = $skuQuery->first()) { $price['found'] = true; $price['price'] = $sku->price; $price['sku'] = $sku->code; } } return $price; }}We use whereHas to check if the SKU has the selected attribute options.
Then, we're displaying the price in Blade, somewhere at the bottom:
@if($price) <div class="mt-4"> @if($price['found']) <p> <span class="text-xl font-bold">Price</span> <span>${{ number_format($price['price'], 2) }}</span><br/> <small>{{ $price['sku'] }}</small> </p> @else <p>We could not find a price for this combination</p> @endif </div>@endifIn this case, if we have a price, it will be displayed like this:

But if, for some reason, there is no price, we'll display a message:

And that's it for this tutorial!
The repository is available here: LaravelDaily/Laravel-Products-Options-Database-Example
Of course, in a real e-shop, as I mentioned before, such price calculation would be done in a dynamic Vue/Livewire component, potentially even showing some attributes depending on other attributes, but this is a topic for potential follow-up lessons. Let me know in the comments if you would vote for that :)